Detailed Explanation of Advanced Settings
The following content will introduce you to the advanced settings part of the software
Basic Task Settings
Workflow Recovery
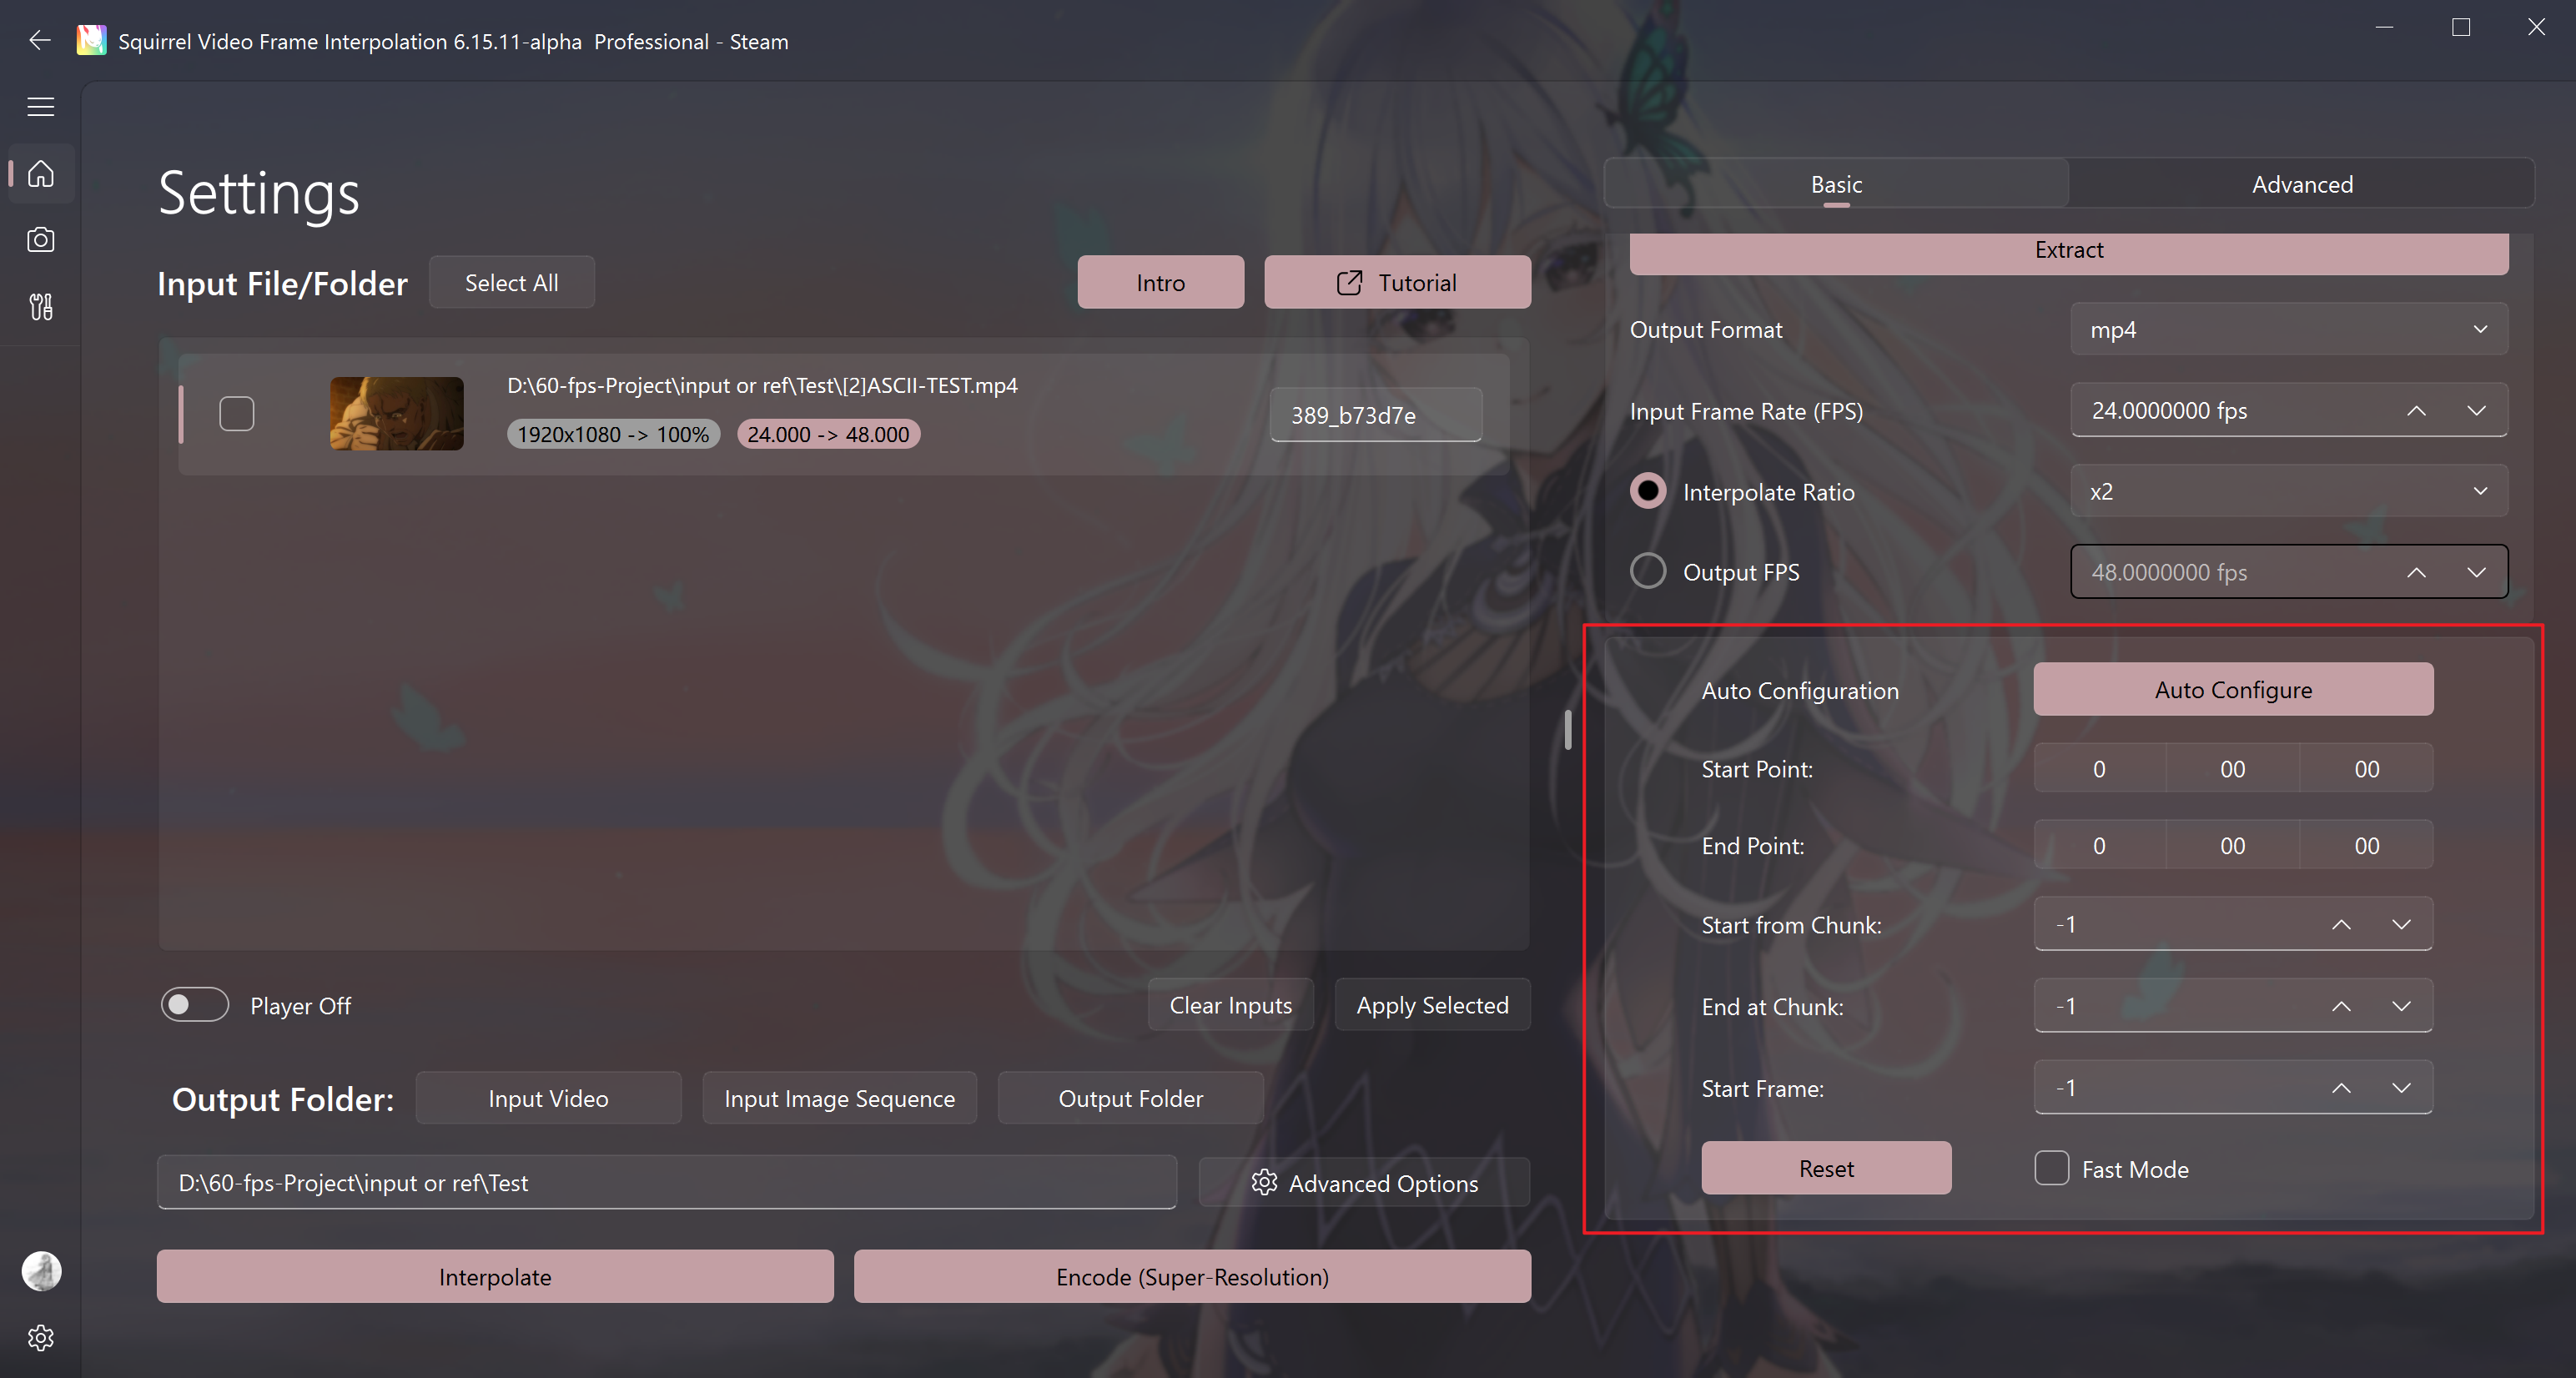
Auto Configure
Tips
- When encountering a situation where the task is interrupted due to power outage or other unexpected situations that terminate the task and cause the program to exit, you can restore the last block position by clicking on Auto Configure.
- You can also directly drag the project folder into the software, and the software will automatically search for the progress corresponding to the project folder.
Please click on the task entry to restore the progress first before clicking this button. Then click "Interpolate", and the software will pop up a window to confirm the starting position of task for you.
Start point and End point
You can select the time period that needs processing
Input format: hours:minutes:seconds
Warning
After specifying the start and end frame, manual termination or power outage may lead to the failure of progress restoration
Start from Chunk and Start Frame
Used when automatic progress search fails or when it is necessary to manually specify the starting position of task, which can be used to manually restore the progress of task.
- Start from Chunk = The last chunk number exported in the output folder + 1 (for example, in the figure, chunk-001, the start block count should be 1+1=2).
- Start Frame =
Single output block size in the output quality setting (rendering setting) * (Start from Chunk - 1).
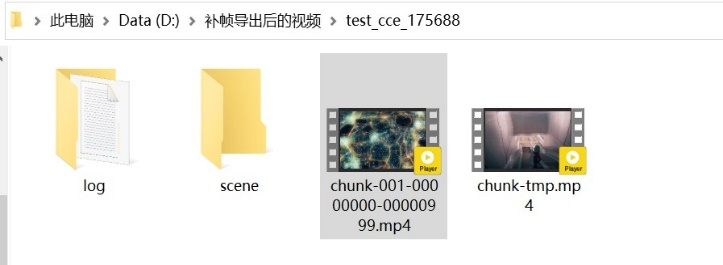
As shown in the above figure, a video chunk has 1000 frames.
Reset
Set the start block and start input frame count to the system default value, and the software will automatically search for the restoration point and restore the task progress.
Fast Mode
When it is necessary to restore the task progress, enabling this item can reduce the time required for the program to restore the progress, but enabling it may cause audio-video out of sync.
Not recommended to enable.
Advanced software settings
Scene Detection
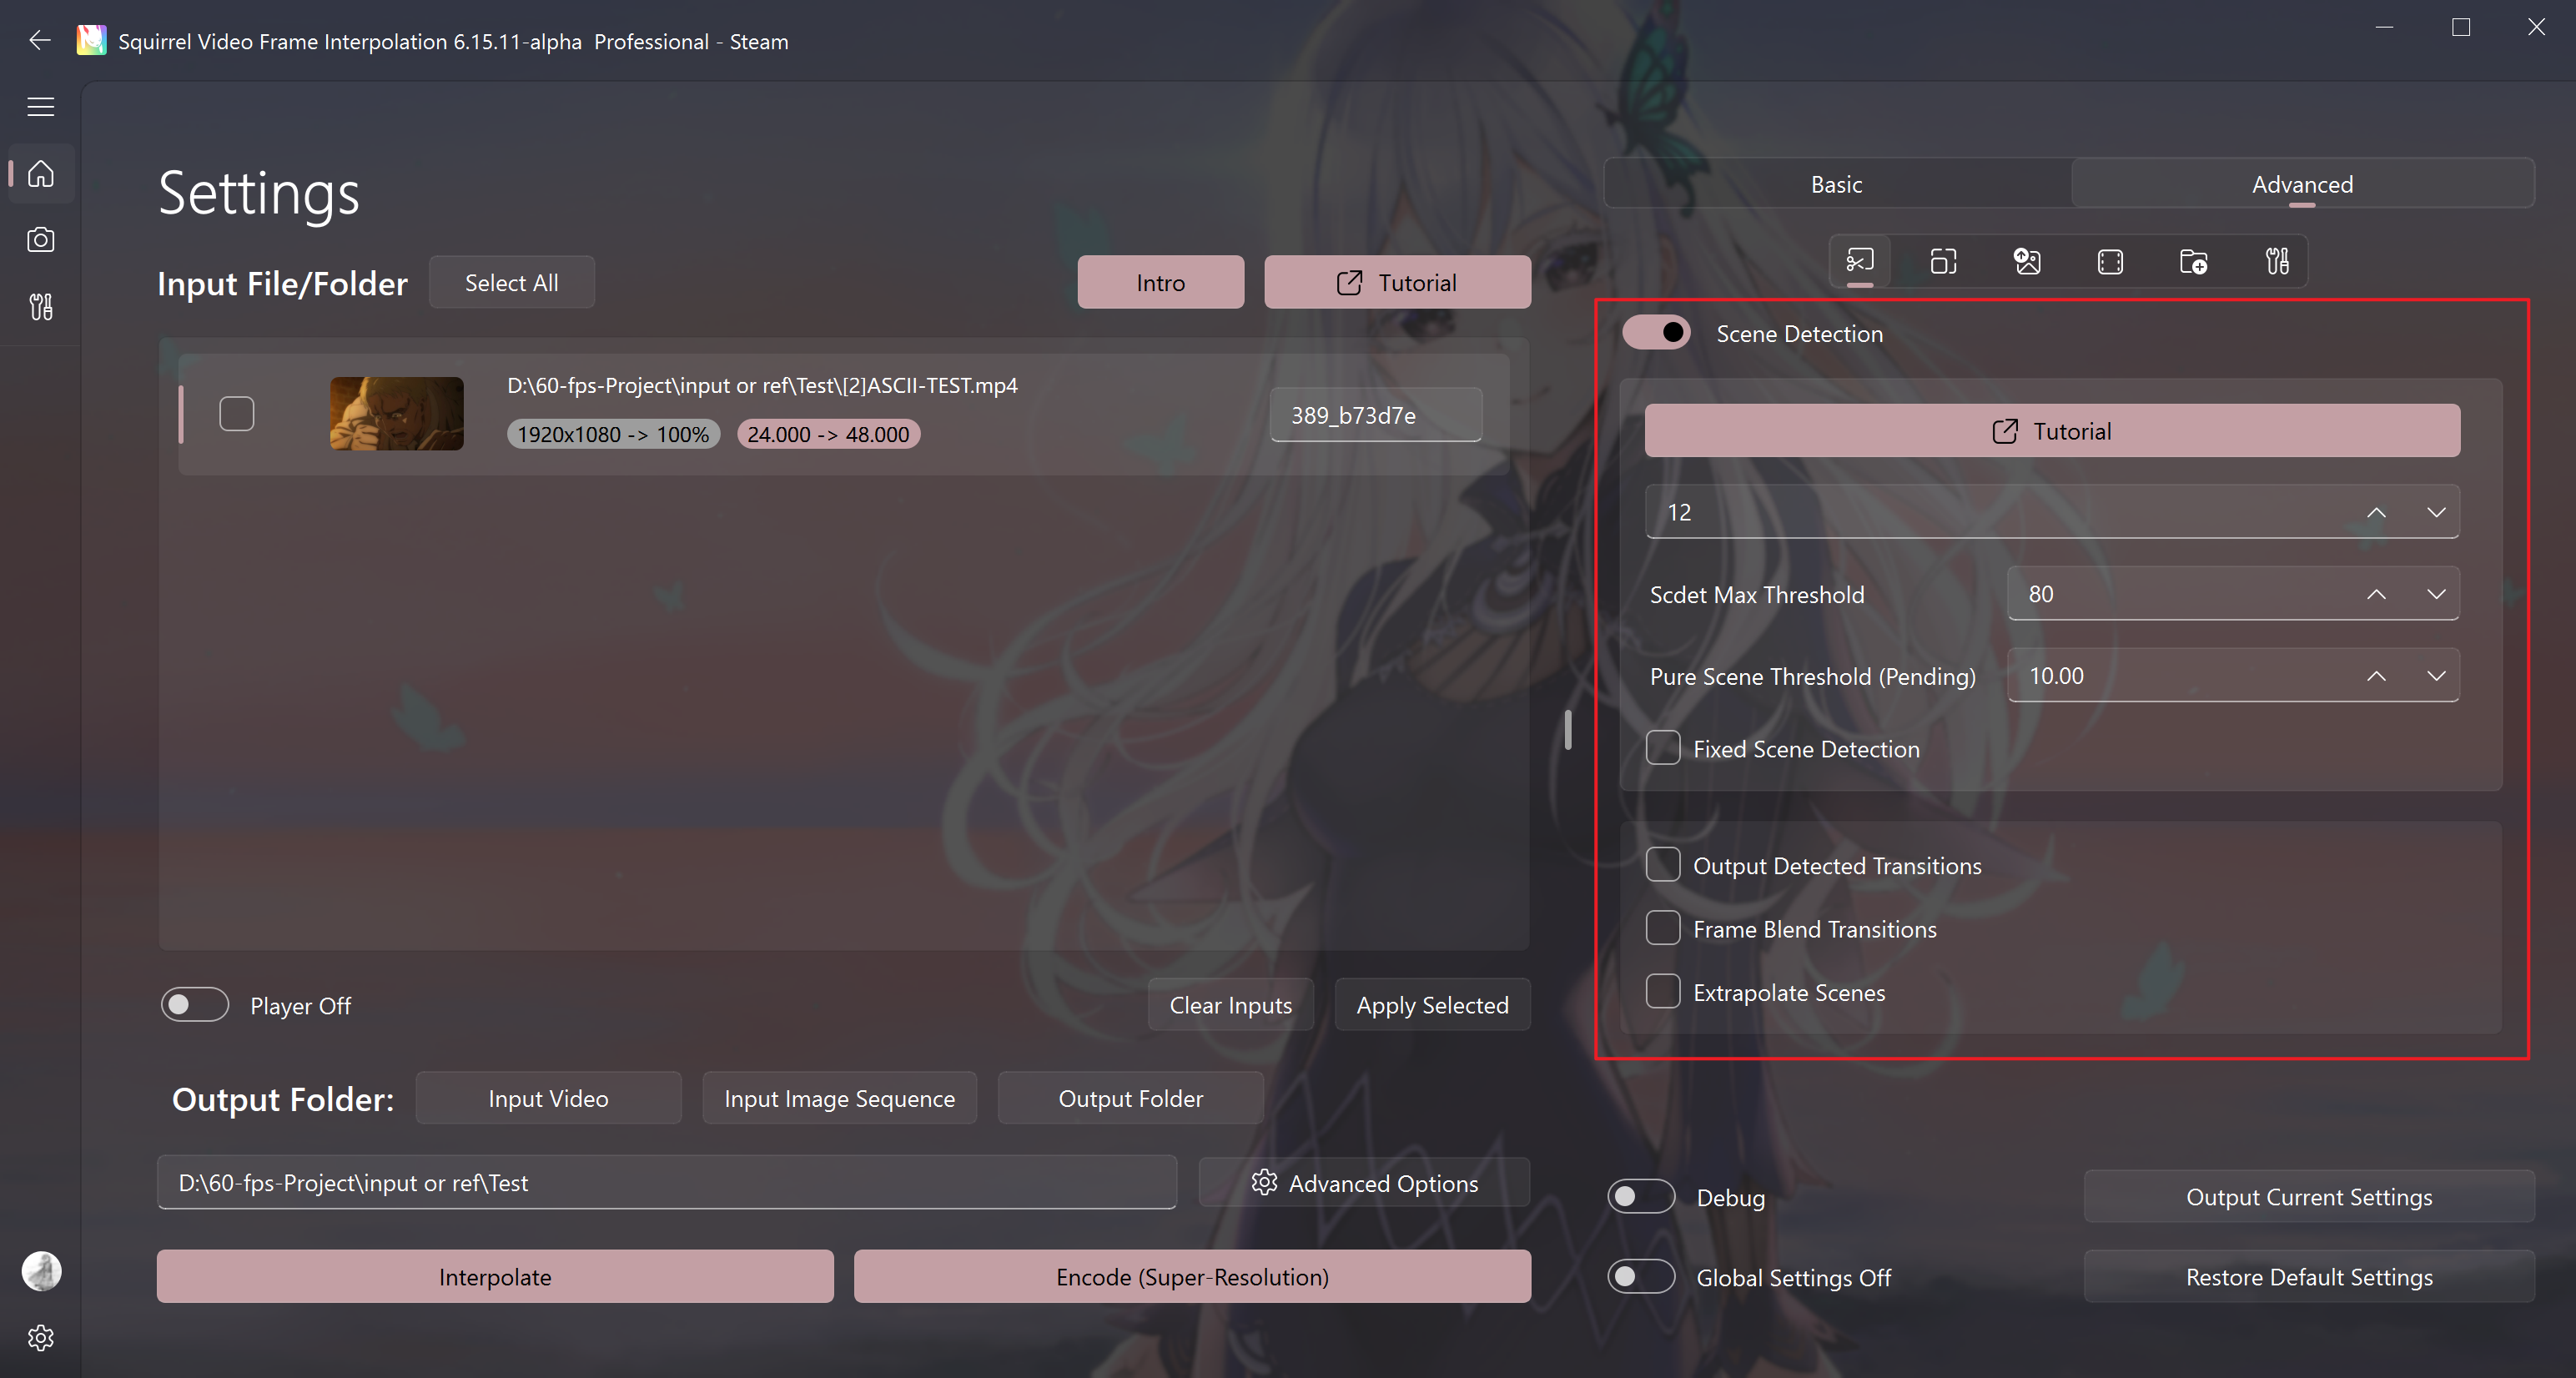
Enable scene detection
Identify scene switches
To avoid the jelly effect when switching scenes during VFI, it is recommended to enable scene detection.
After enabling the scene detection option, the default value for the parameter below is usually 12; if you find that the final exported video is rather choppy, you can consider adjusting it to 15; if you find that there is a significant amount of jelly effect, you can consider adjusting the parameter value to 9, and the range of the parameter value is typically between 9 and 15.
As shown in the picture: jelly produced by missed judgment in transition

Warning
Due to the fact that this scene detection mechanism is designed based on long video input, for some short video input (2-3 seconds), it is recommended to disable this scene detection function or use third-party software to generate transition data for manual transition processing to avoid jitter caused by poor automatic recognition performance.
Scdet Max threshold (default does not need to be adjusted)
When using a fixed scene detection is not enabled (default), the recommended value for this option is 80-90.
When using a fixed scene detection is enabled, the recommended value for this option is 40-60.
Fixed Scene Detection
Use a fixed threshold (maximum recognition threshold) to identify transitions (unstable), at which point the software will perform a similarity detection on every two frames of the video.
If the similarity is greater than the threshold, it is considered a transition frame. This mode is prone to false positives or missed detections, and is only recommended to be used when there are many missed detections with the default transition detection method, such as in a mashup with a large number of lenses.
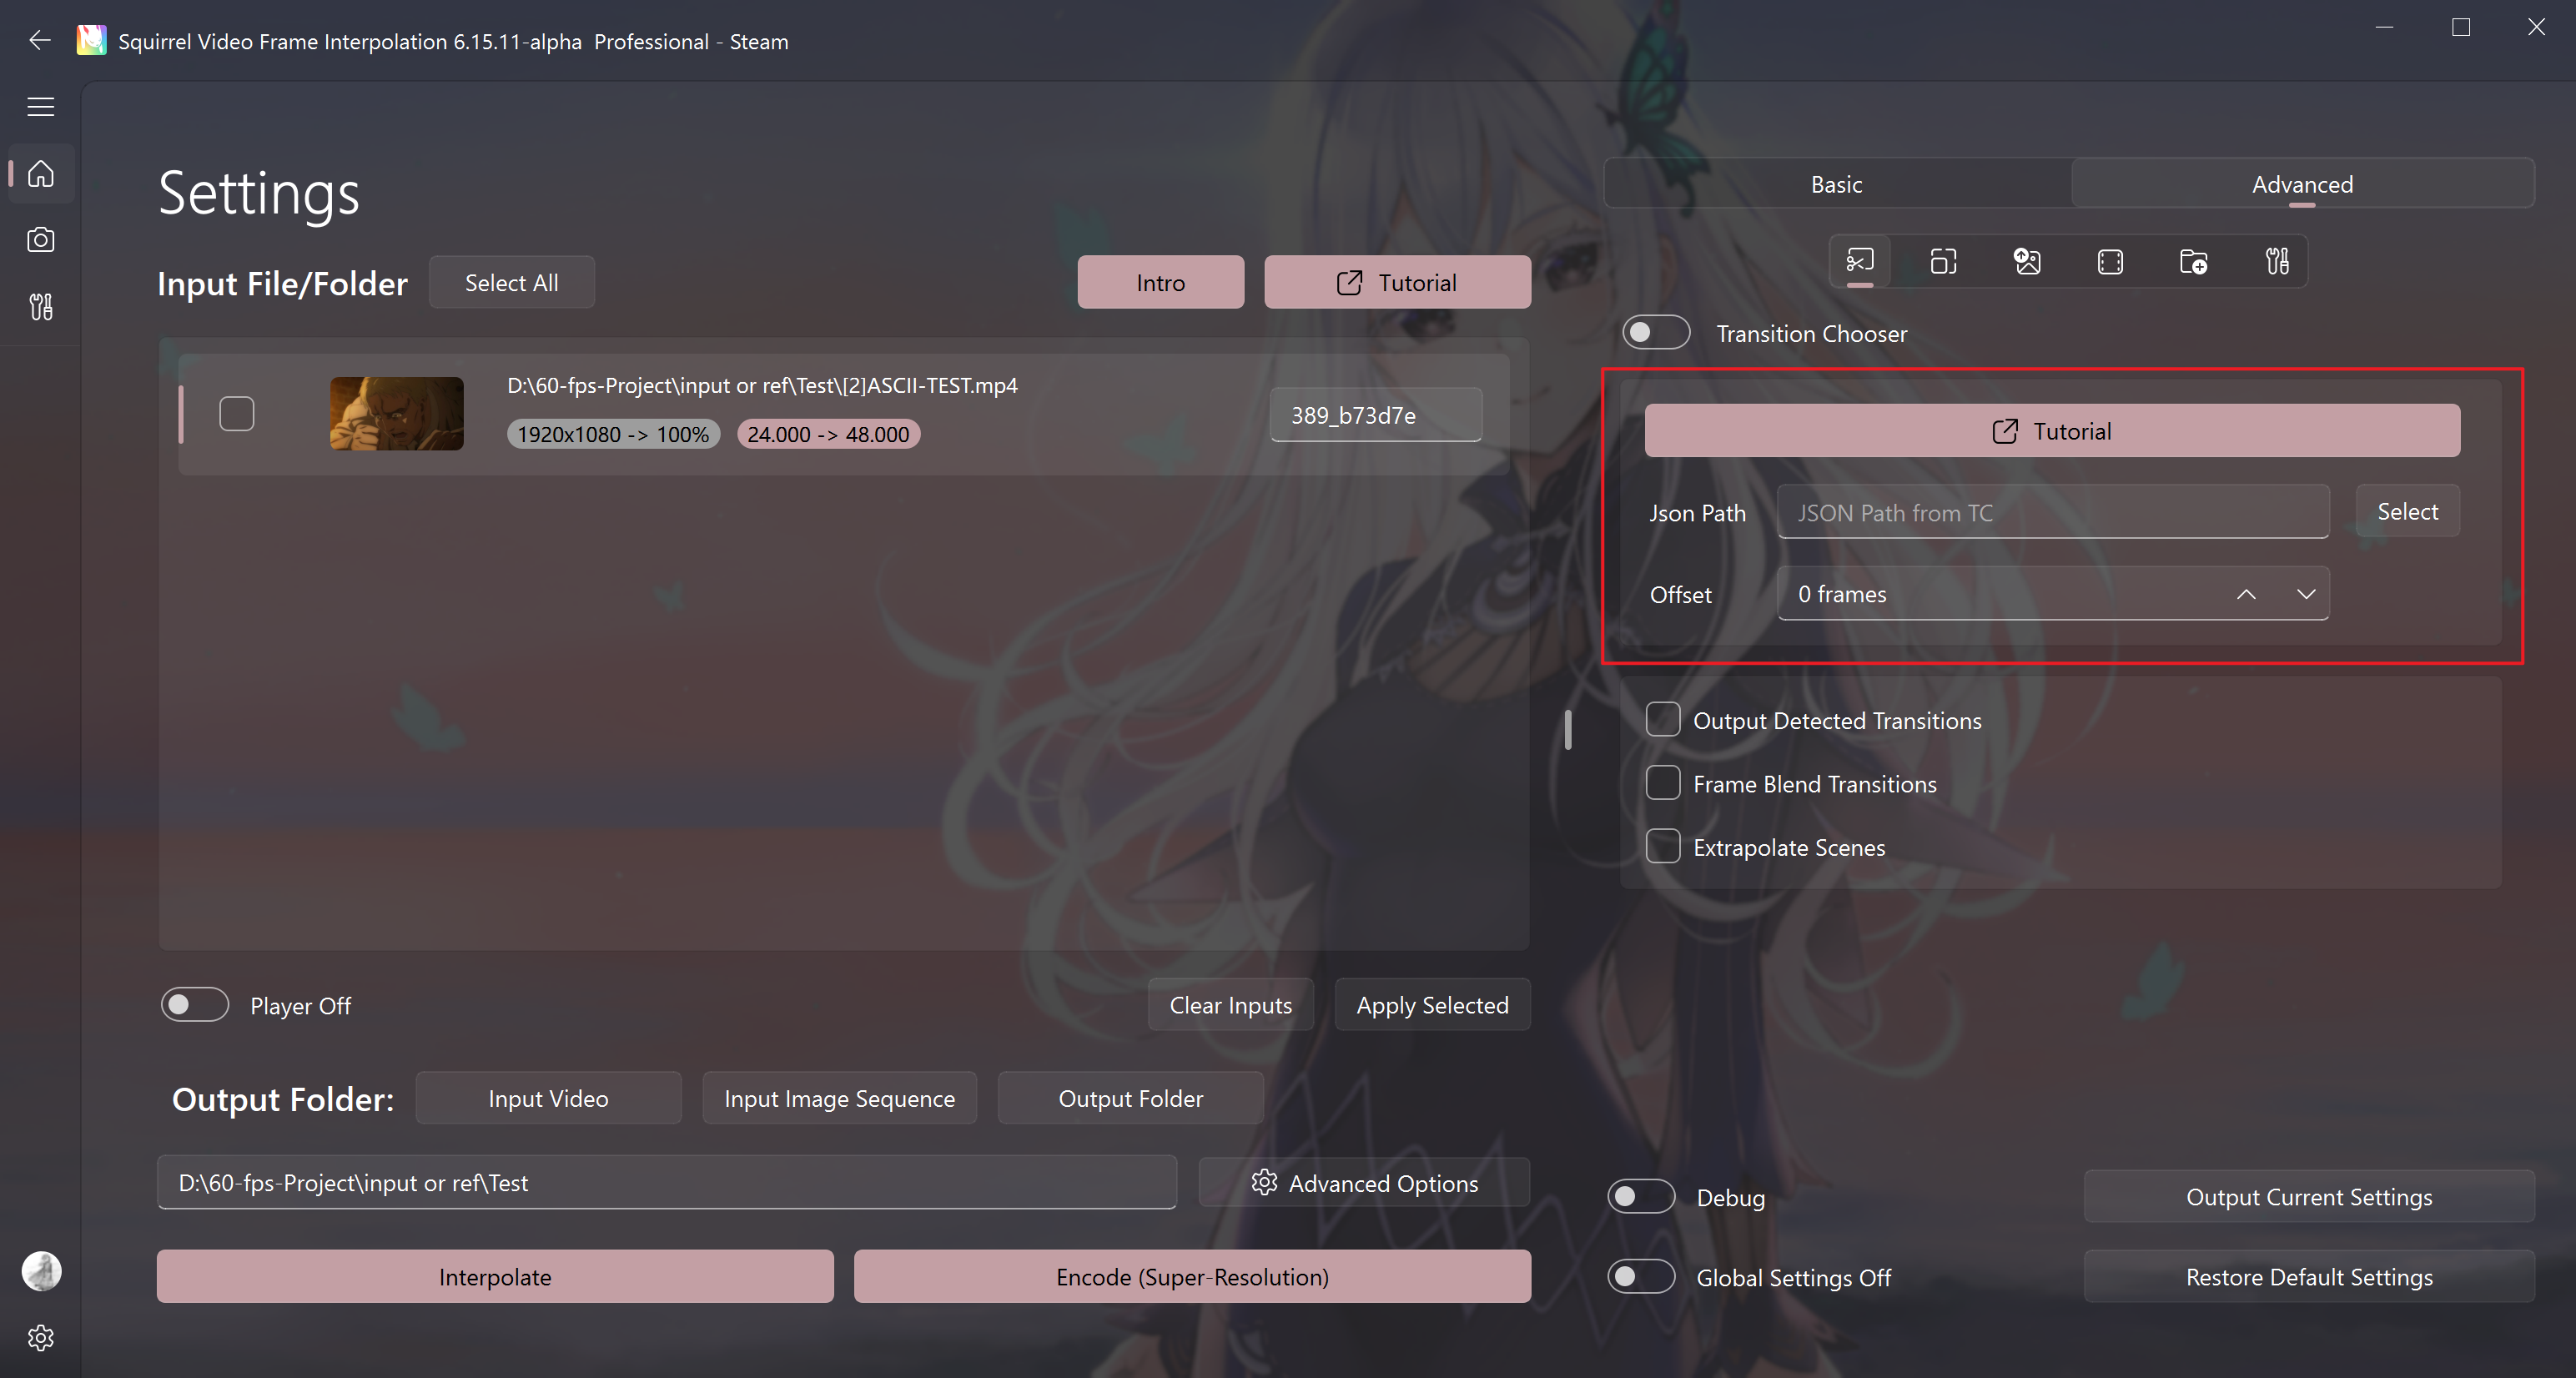
Manual selection of transition support
Display when the "scene detection" button is turned off
The Json path option fills in the path of the transition list file exported by the Transition Chooser for the video, see Usage Tutorial.
This method enables the import of transitions manually marked using TC software to replace the automatically recognized transitions, providing full control over where to fill frames and where not to in the input video.
Other scene detection settings
Output Detected Transitions
Output the scene frames in the video.
The scene frames will be accompanied by relevant decision information and output in the scene folder of the project folder in png format. The project folder will be retained.
Frame Blend Transitions
By default, it is to copy the previous frame as the transition frame. This method is to blend the previous and next frames (gradually) to reduce the jitter caused by copying the transition frame.
Extrapolate Scenes
By default, it is to copy the previous frame as the transition frame. This method uses the first two frames of the transition frame and uses the VFI algorithm for interpolation to reduce the jitter caused by copying the transition frame.
Warning
It is not recommended to enable this option when using the RIFE algorithm, otherwise jelly will be introduced.
Output Resolution Settings
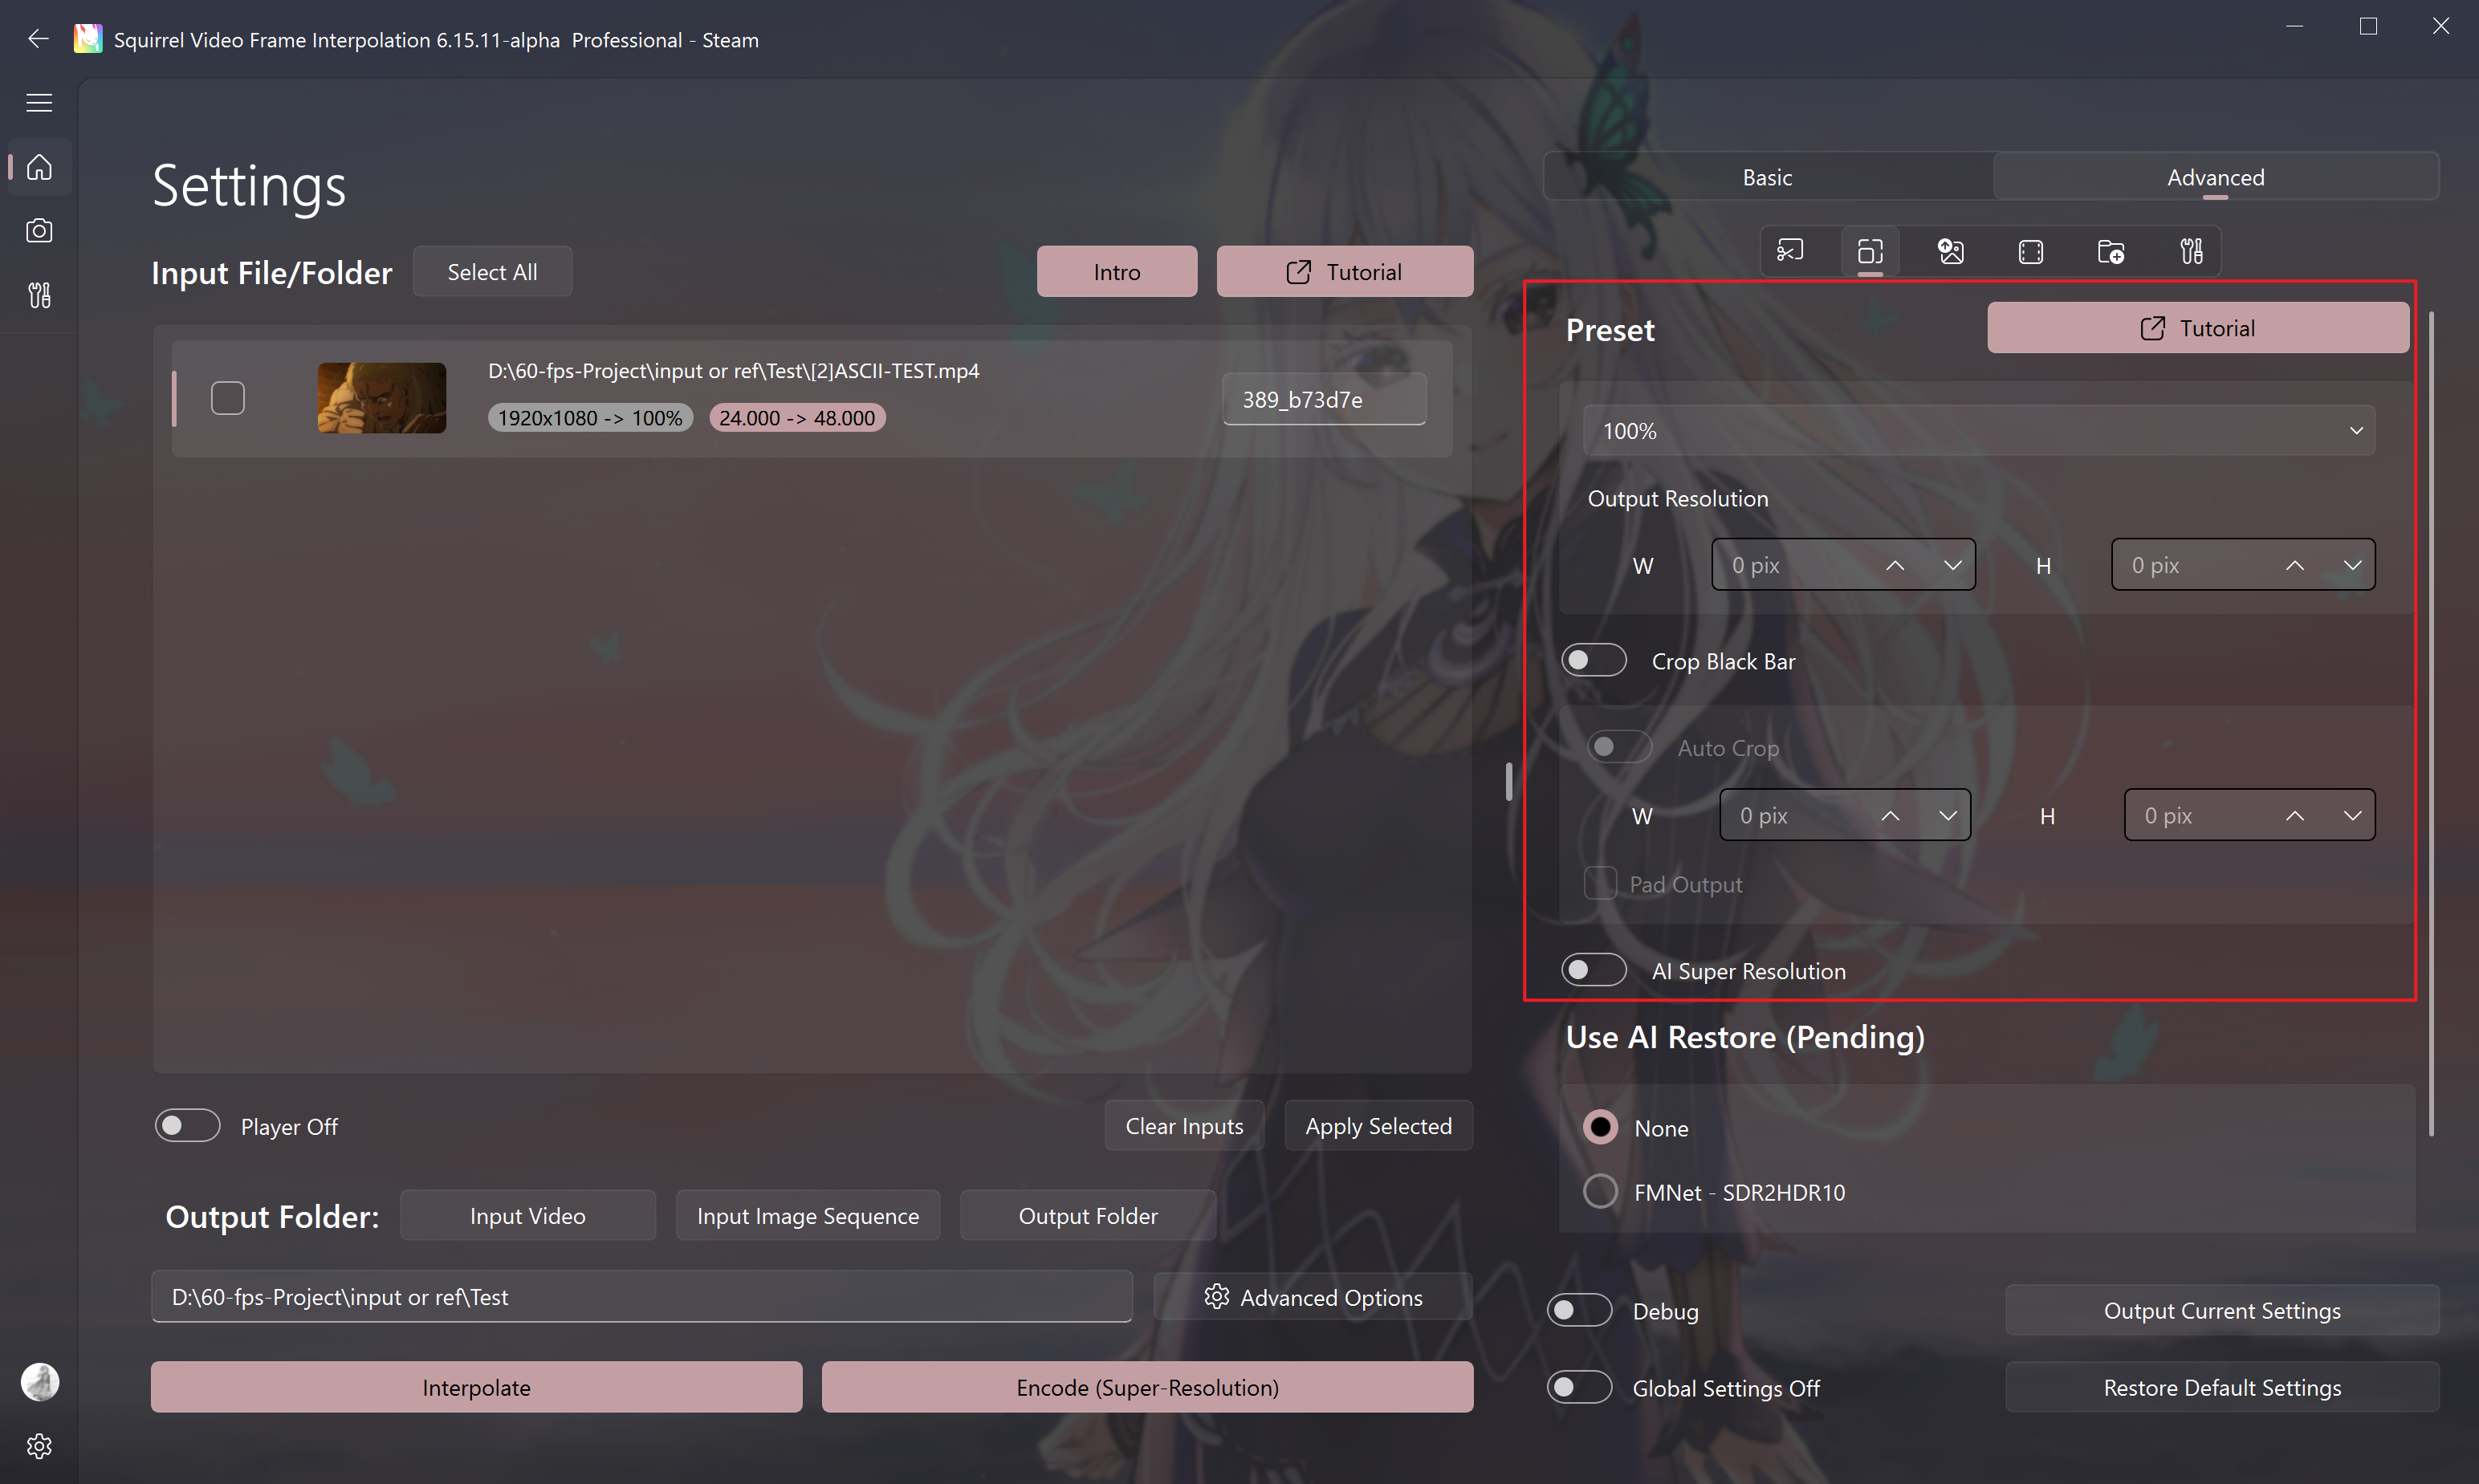
Output Resolution Preset
The dropdown box is used for resolution preset selection.
When the preset is Custom (user-defined), you can set the final output resolution of the video. SVFI will adjust the resolution of the picture first, and then perform VFI.
Symmetrical Cropping
Can be used to crop the black bars in the video, and the width and height need to be specified manually.
Note: If AI super-resolution is used, the video here refers to the final output videoExample: Video Note resolution 3840x2160, actual picture resolution 3840x1620, then the height here is filled in as
270 = (original height - actual height) ÷ 2.
Example: Input video 1920x1080, actual resolution 1920x800, super-resolution 2x output 3840x1600. Then the black border height is filled in as 280, and the output resolution can be customized to 3840x1600
Tips
If both width and height are entered as -1, SVFI will automatically identify the black bars of the input video and crop them.
Pad Output
After cropping the black bars, perform processing (VFI or super-resolution), and automatically add the black bars back after filling the frames.
Tips
This can reduce the amount of computing per frame to some extent and speed up the processing.
AI Super Resolution - to Make Video Images Clearer
Tips
This feature requires the purchase of the Professional DLC.
Warning
Performing VFI and super-resolution simultaneously will consume more video memory, and insufficient video memory may cause the task to fail.
If the video memory is less than 10G, it is recommended to press Encode button to complete the super-resolution first, and then perform VFI in another task.
Is SR later than VFI
Perform VFI first, and then perform super-resolution (this usually slows down the speed, but reduces the video memory usage and often achieves better results).
Process GPU
Specify which graphics card to use for super-resolution.
Super-Resolution Algorithm
Introduction to Other Super-Resolution Options
Super-Resolution Model multiplier
The super-resolution ratio of the currently selected model
Intermediate Resolution Ratio
That is, the pre-scaling function: first scale the original video by the percentage set by the user, and then perform super-resolution
Example: Original video: 1920x1080, transfer resolution ratio: 50%, model upscale: 4x
At this time, the software running process is:
1920x1080(input) ->960x540(down-scaled by 50%) ->3840x2160(super-resolution)
Tips
- For restoration models, the transfer resolution will be forced to be set to 100%.
Warning
- SVFI will only perform one super-resolution or restoration process on each frame, which means that when the user sets the output resolution to
400%but uses the 2x model for super-resolution, SVFI will only perform super-resolution on the original video once to 200% using the super-resolution model, and then stretch it to 400% using bicubic. - Therefore, using 100% transfer resolution, using a 2x model for 400% super-resolution, and using a 4x model for 200% super-resolution will have different effects.
- When the super-resolution upscale is inconsistent with the model upscale, using tiling may cause the output video to be garbled.
Tiling mode for CUGAN
Dedicated to certain models, smaller the tile size, the more video memory you save, and the slower the speed
No Tile: Do not use cutting
1/2 on Width: Split horizontally in half
1/2 on both W and H: Split horizontally and vertically in half
1/3 on w & h: Cut horizontally and vertically into three equal parts
1/4 on w & h: Cut horizontally and vertically into four equal parts
RealCUGAN Low Video Memory Mode
Dedicated to realCUGAN, to be used when the video memory of the graphics card is insufficient
None: Do not use the low video memory mode
Low VRAM Mode: Enable the low video memory mode, which may affect the picture quality
Tiling Size
- There are presets for the size of the video memory, and you can also choose to customize the adjustment
Suggested operation when encountering video memory shortage
- For graphics cards with less than 6G of video memory, if the video memory is insufficient, directly enable tiling, and keep other options default.
- For more than 6G, try not to enable tiling, and enable the tiling mode. If it is still out of video memory when the maximum (1/4) is turned on, turn off this setting and directly enable tiling, and try the options from large (512) to small in turn.
- For 4G or less video memory, please enable the low video memory mode and directly enable tiling.
Warning
It is not recommended to enable this option when using realCUGAN
Intensity for CUGAN
Only used for the RealCUGAN super-resolution model series
For non-TensorRT models: the smaller the value, the clearer and sharper the image, and the larger the value, the more conservative and stable (recommended value range 0.5-1.2)
For TensorRT models, the opposite is true: the smaller the value, the more blurred the image, and the upper limit is 1.
Super-Resolution Threads
When there are multiple graphics cards or the graphics card occupancy is not fully utilized, you can try to increase this value (by 1 at a time)
Super-Resolution Sequence Length
Only valid when algorithms such as BasicVSR series and InPaint that require multi-frame input are selected
- The larger the super-resolution sequence length, the more frames are input in a single super-resolution, and the texture is more stable, but at the same time, the video memory usage will increase.
- It is recommended to keep this value above 10. If the video memory is insufficient, it is recommended to reduce the picture resolution and ensure that the value is above 5.
- For the watermark removal (InPaint) model, this value is generally recommended to be above 30 to obtain a better watermark removal effect.
Super-Resolution Using Half-Precision
- It is recommended to enable, which can greatly reduce the video memory usage and have little impact on the picture quality.
Caution
When using NVIDIA 10xx series Pascal architecture graphics cards, enabling this option will slow down the super-resolution speed and may cause the output to be black. It is recommended to turn off this option.
TTA
Only supported by ncnnCUGAN, in exchange for a small improvement in image quality at the cost of a large amount of time consumption
AI Restore
Tips
This feature is only available in the beta version of the public test
FMNet - SDR2HDR10: Use AI algorithm to convert SDR video to HDR10
DeepDeband: Use AI algorithm to remove color bands (this may cause the picture color to turn pink)
Output Settings (Encode Parameter Quality)
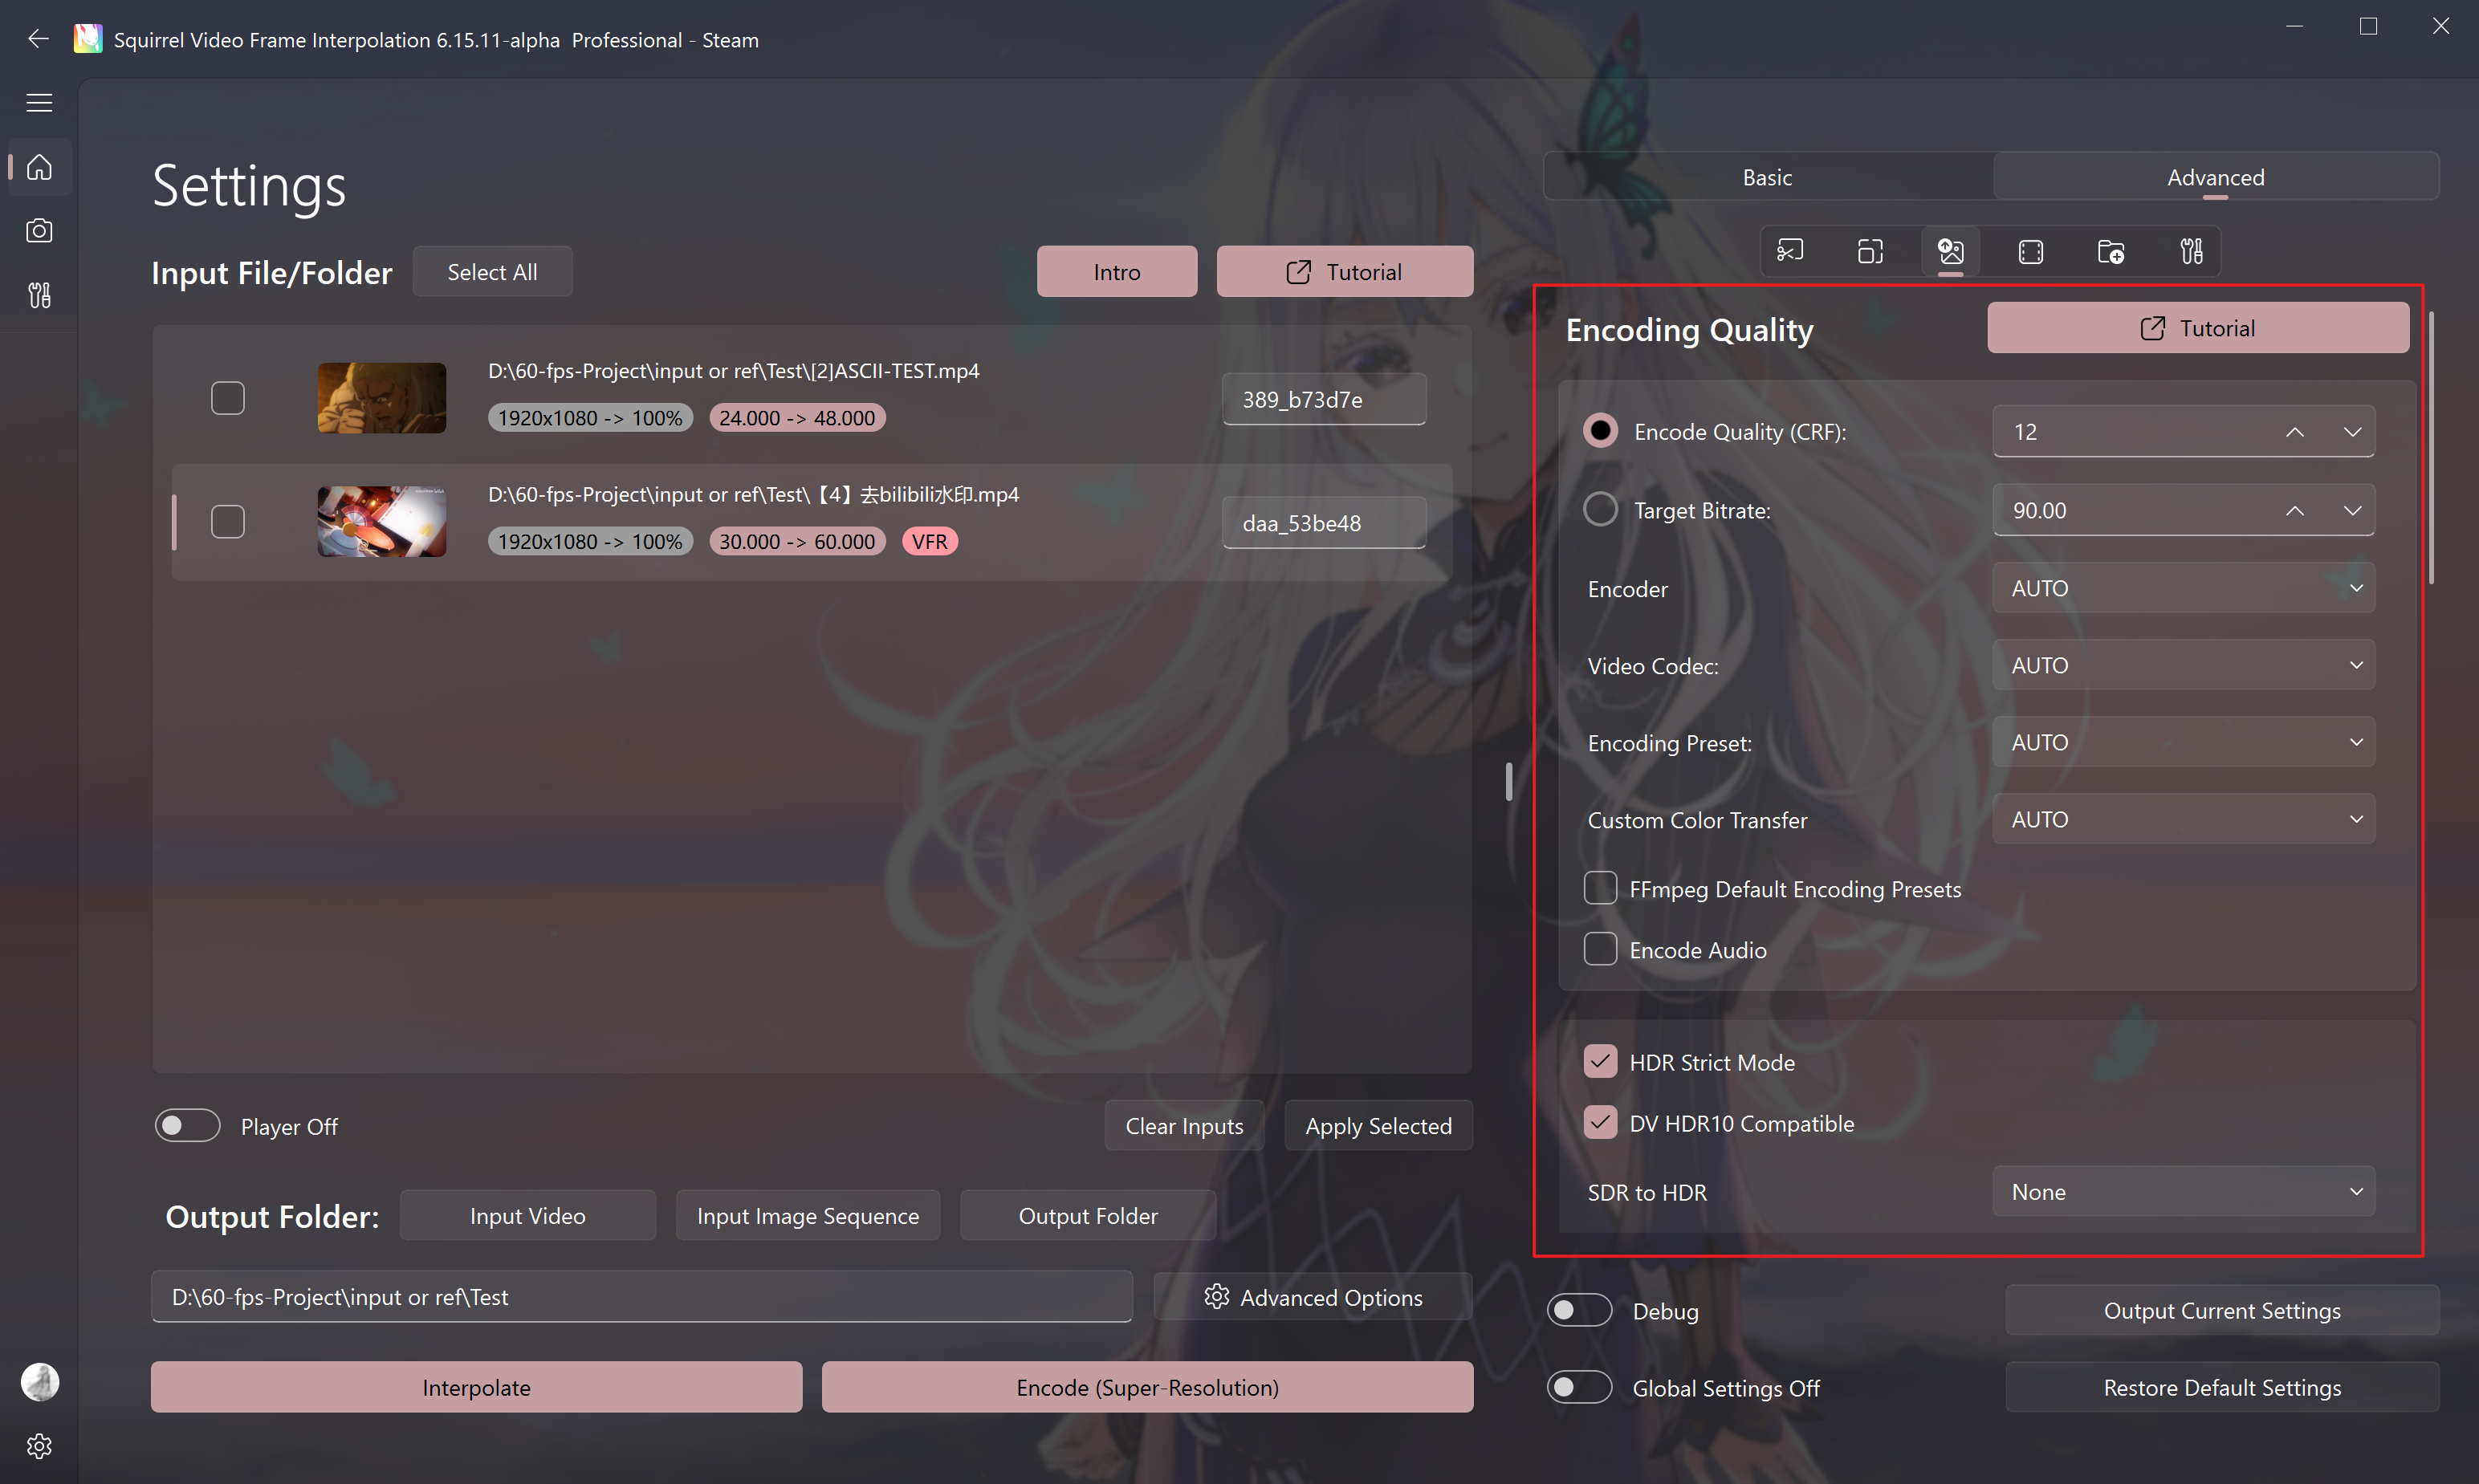
Encode Quality CRF
Used to adjust the quality loss when the video is exported, which is positively correlated with the output bitrate.
Using different encoding codecs and encoding presets will have an impact on CRF.
The CRF numerical parameter is generally 16, which is lossless to the naked eye;
For H.265 encoding, the bitrate will be significantly reduced. Please use the visual quality of the picture to determine whether the CRF numerical value is reasonable.
If it is used for collection-level output, the CRF numerical parameter can be set to 12.
The smaller the CRF value, the less the loss of the picture after the operation, and the larger the volume (bitrate) of the exported finished video.
Note: For the same value, the output quality of different codecs is different
Tips
When adjusting the output video bitrate, if you are not familiar with CRF, please use the default parameter 16 or learn relevant knowledge through Google.
Target Bitrate
As an alternative option to render quality CRF, it is basically the same as the settings standards of Premier Pro, After Effects, and DaVinci Resolve
Encoder
- AUTO
Automatically determine the encoder option based on the slider below the software - CPU
Select this option for encoding, the quality is the highest, but the CPU usage rate is also the highest. The performance of the CPU determines whether the frame interpolation or super-resolution process will be blocked (resulting in a decrease in the graphics card usage) and the length of time it takes to complete the final operation. - NVENC
This option is only for NVIDIA graphics cards that support the NVENC function. If your graphics card does not support the NVENC function, please do not select this option.
Please refer to the NVIDIA NVENC Gen.pdf in the installation directory to check whether your graphics card supports NVENC - VCE
This option is only for AMD graphics cards that support the VCE function. If your graphics card does not support the VCE function, please do not select this option. - QSV
This option is only for users with Intel integrated graphics (such as Intel UHD 630, IrisPro 580). Non-such users should not select this option.
Tips
The following codecs need to purchase the Professional DLC
- NVENCC is an optimized version of NVENC, with faster processing speed and better work quality.
- QSVENCC is an optimized version of QSV, with higher efficiency in completing tasks.
- VCENCC is an optimized version of VCE, with higher efficiency in completing tasks.
Manually specify the GPU used by the hardware encoder
In the custom encoding command line option of the advanced settings,
- When using the encc encoder, fill in
-d||<gpu>to control the used encoding GPU, such as-d||0 - When using the ffmpeg nvenc encoder, fill in
-gpu||<gpu>to control the used encoding GPU - When using the ffmpeg vce, qsv encoder, fill in
-init_hw_device||qsv=intel,child_device=<gpu>to control the used encoding GPU
Sensible comparison:
| Encoder | Use Hardware | Speed | Quality | File Size | Selection Suggestions |
|---|---|---|---|---|---|
| CPU | CPU | Medium | High | Medium | Users who pursue image quality and encoding stability, and AMD GPU users and AU users |
| NVENC | NVIDIA GPU | Fast | Medium | Large | Users who pursue both speed and quality, and are not sensitive to size |
| QSV | Intel Integrated Graphics | Fast | Medium | Large | Users who pursue both speed and quality, and are not sensitive to size |
Select the encoding codec
For the selection of this function, you need to have certain video encoding knowledge.
If you are not familiar with encoding, please keep the following rules in mind:
- HDR output must select H.265 10bit encoding
- For resolutions above 2K, H.265 encoding must be selected: especially 4K, 8K resolutions
- If there are problems with both H.264 and H.265 encoding, use ProRes encoding. This encoding output is closest to the lossless, and the bitrate is extremely large. It is an intermediate encoding format used for editing work.
- It is recommended to use H.265 fast encoding or ProRes encoding.
- When a
Broken Pipeerror occurs, please directly use H265 encoding. Please note that the above encoding has the highest resolution and frame rate limitations, - Please do not deliberately pursue too high a resolution and frame rate at the same time: such as 8K 120fps
Tips
- CPU encoding is software encoding, and software encoding generally has slow speed, small files, and good quality.
- NVENC, QSV, and VCE are hardware encodings, where NVENC uses NVIDIA graphics cards, QSV uses Intel integrated graphics, and VCE uses AMD graphics cards. The characteristics of hardware encodings are fast speed, large files, and in the case of low bitrate and small files, the quality is worse than that of the CPU.
- Hard encoding gives priority to NVENC. In the NVIDIA GPU hard encoding preset (you can hover the mouse to view the description), you can query the hard encoding preset level of your own graphics card on the driver official website. Generally, 20 and 30 series are 7th+.
- Hard encoding will put a certain load on the graphics card. If the Broken Pipe error occurs when using NVENC, please reduce the NVIDIA GPU hard encoding preset or switch to the core display encoding QSV.
- If there is still the same error, use the CPU.
Other general suggestions
- If the output is only for personal viewing and the requirements for encoding quality are low, please try to use hardware encoding (NVENC, VCE, QSV, etc.) to avoid CPU encoding bottlenecks. CPU bottlenecks will cause a decrease in the graphics card usage rate, which in turn will cause a decrease in the task speed
Select the encoding preset
CPU: the faster the speed, the lower the quality, and vice versa.
NVENC (edicated to NVIDIA GPU): It is recommended to select p7 without thinking
QSV (dedicated to Intel graphics card): Select slow directly
VCE (dedicated to AMD GPU): Select quality directly
NVENCC (dedicated to NVIDIA GPU): Select quality directly
QSVENCC (dedicated to Intel graphics card): Select best directly
VCENCC (dedicated to AMD GPU): Select slow directly
Enable Zero-Latency-Decode Encode
It is only valid when H264 or H265 is selected at the encoding codec with CPU encoder.
Using this feature can reduce the video decoding pressure, and is suitable for scenarios that require fast decoding and low latency, such as:
- When uploading video works to platforms such as BiliBili and Youtube, to avoid jitter transcoding
- When playing ultra-high-definition and ultra-high-frame-rate content on VR headsets
- When the player decodes the screen is distorted
Warning
This feature does not work when the input is HDR
NVENC encoding preset
When choosing the NVENC encoder, the preset can reduce the export video size without changing the picture quality. You need to query which generation of NVENC encoding chip your NVIDIA GPU is. If it exceeds 7th, directly select 7th+.
FFmpeg Default Encoding Presets
Using the traditional encoding scheme, the compatibility is strong, and the export video size may increase.
Tips
Enabling this feature can solve most broken pipe problems.
Encode Audio
- Re-encode the audio, generally used on videos uploaded to the platform
- Compress all audio tracks in the video to 640kbps aac format.
HDR Strict Mode
Process HDR content with strict presets, enabled by default
DV HDR10 Compatible
Enable HDR10 compatibility when outputting Dolby Vision, enabled by default
SDR to HDR: Convert SDR video to HDR10+
Four one-click HDR modes need to be tried by yourself
Decoding Quality Control
Use VSPipe for pre-decoding
Tips
This feature requires the purchase of the Professional DLC.
Using vspipe as pre-decoding, this function is a prerequisite for many specific functions (such as deblocking, quick noise addition, QTGMC deinterlacing),
If you find that it cannot decode the input or the task reports an error, please turn off this option.
Tips
You can modify the vspipe.py template file in the software installation directory by yourself to add custom filters such as dpir. You can also modify and use the order of upscaling and frame interpolation with VSPipe based on it.
Full VSPipe Workflow
Tips
This feature requires the purchase of the Professional DLC.
The entire process is processed using vspipe to reduce unnecessary calculations. It is the mode that can achieve the fastest speed under the same settings of the current SVFI.
Only supports TensorRT-accelerated super-resolution and some frame interpolation models.
If this setting is enabled for frame interpolation, the spatio-temporal smoother (TruMotion) smoothness optimization will be forced to be enabled.
Hardware Decoding
It can reduce the decoding pressure of large-resolution videos, but may reduce the picture quality to a certain extent, and cause the frame interpolation module to run out of video memory when the video memory is tight.
Fast Extraction
Fast frame extraction operation can reduce decoding pressure, but may cause color deviation in the picture.
High-Precision Optimization Workflow
Tips
This feature requires the purchase of the Professional DLC.
- If the CPU performance is excessive, it is recommended to enable this feature, which can solve most color deviation problems and can solve the color cast problem caused by HDR video encoding to the greatest extent. This feature will increase the CPU burden and even affect the frame interpolation speed.
- Enabling this feature for super-resolution work will disable half-precision (requires more video memory). Please choose according to your needs.
Tips
It is recommended to enable this option when inputting HDR videos.
Enable Deinterlacing
Tips
This feature requires the purchase of the Professional DLC.
Use ffmpeg to perform deinterlacing processing on the input interlaced video.
When using vspipe for pre-decoding, use QTGMC deinterlacing to process the picture.
Denoise
Tips
This feature requires the purchase of the Professional DLC.
The "Fast" option in this column, if there is no special need, please keep it closed, otherwise it will slow down the task processing speed.
Tips
It is recommended to test this option by controlling the variables yourself to see if it is helpful for improving the picture quality.
Not compatible with high-precision optimization workflow
Fast Grain
Add noise to the video, often used when super-resolving the video.
Custom Decoding Parameters (Professional Option)
Used to replace the parameters used by ffmpeg or vspipe for decoding, and custom parameters are separated by ||.
Custom Encoding Settings
Specify the number of encoding threads
When the encoder is CPU, there is a chance to control the CPU usage rate to control the rendering speed.
Customized Encoding Parameters
This feature is a professional option (note that the number of input items must be even),
The key values are separated by ||
Example Custom encoding parameters for CPU h265 encoding:
-x265-params||ref=4:me=3:subme=4:rd=4:merange=38:rdoq-level=2:rc-lookahead=40:scenecut=40:strong-intra-smoothing=0
You can also addpools="8,8,8,8"to assign core specific encoding threads
Time Remapping: Change the Speed of the Video
Tips
This feature requires the purchase of the Professional DLC.
This feature is used to create "slow motion" materials.
For example, if the output frame rate is set to 120 frames and the time remapping is set to 60 frames, the output effect is equivalent to 50% slow playback of the playback speed.
Similar to other situations, you can set the output frame rate by yourself, support decimals.
Warning
For anime materials, please try to enable Forward Dedup in the Smoothness Optimization of the VFI Settings as much as possible.
Or use software such as Premiere to reduce the frame rate of the original video to remove the repeated frames to avoid jitter after remapping.
The frame rate of the original video is generally reduced to 8 or 12 fps
Loop
Put the last frame in the first frame to adapt to some looping videos that are connected end to end.
Tips
Under normal circumstances, the end will miss (output frame rate / input frame rate) frames because there are no new frames that can be interpolated, which is normal. But it is not affected in the loop mode, because there are always frames that can be used as pairs for interpolation.
IO Control
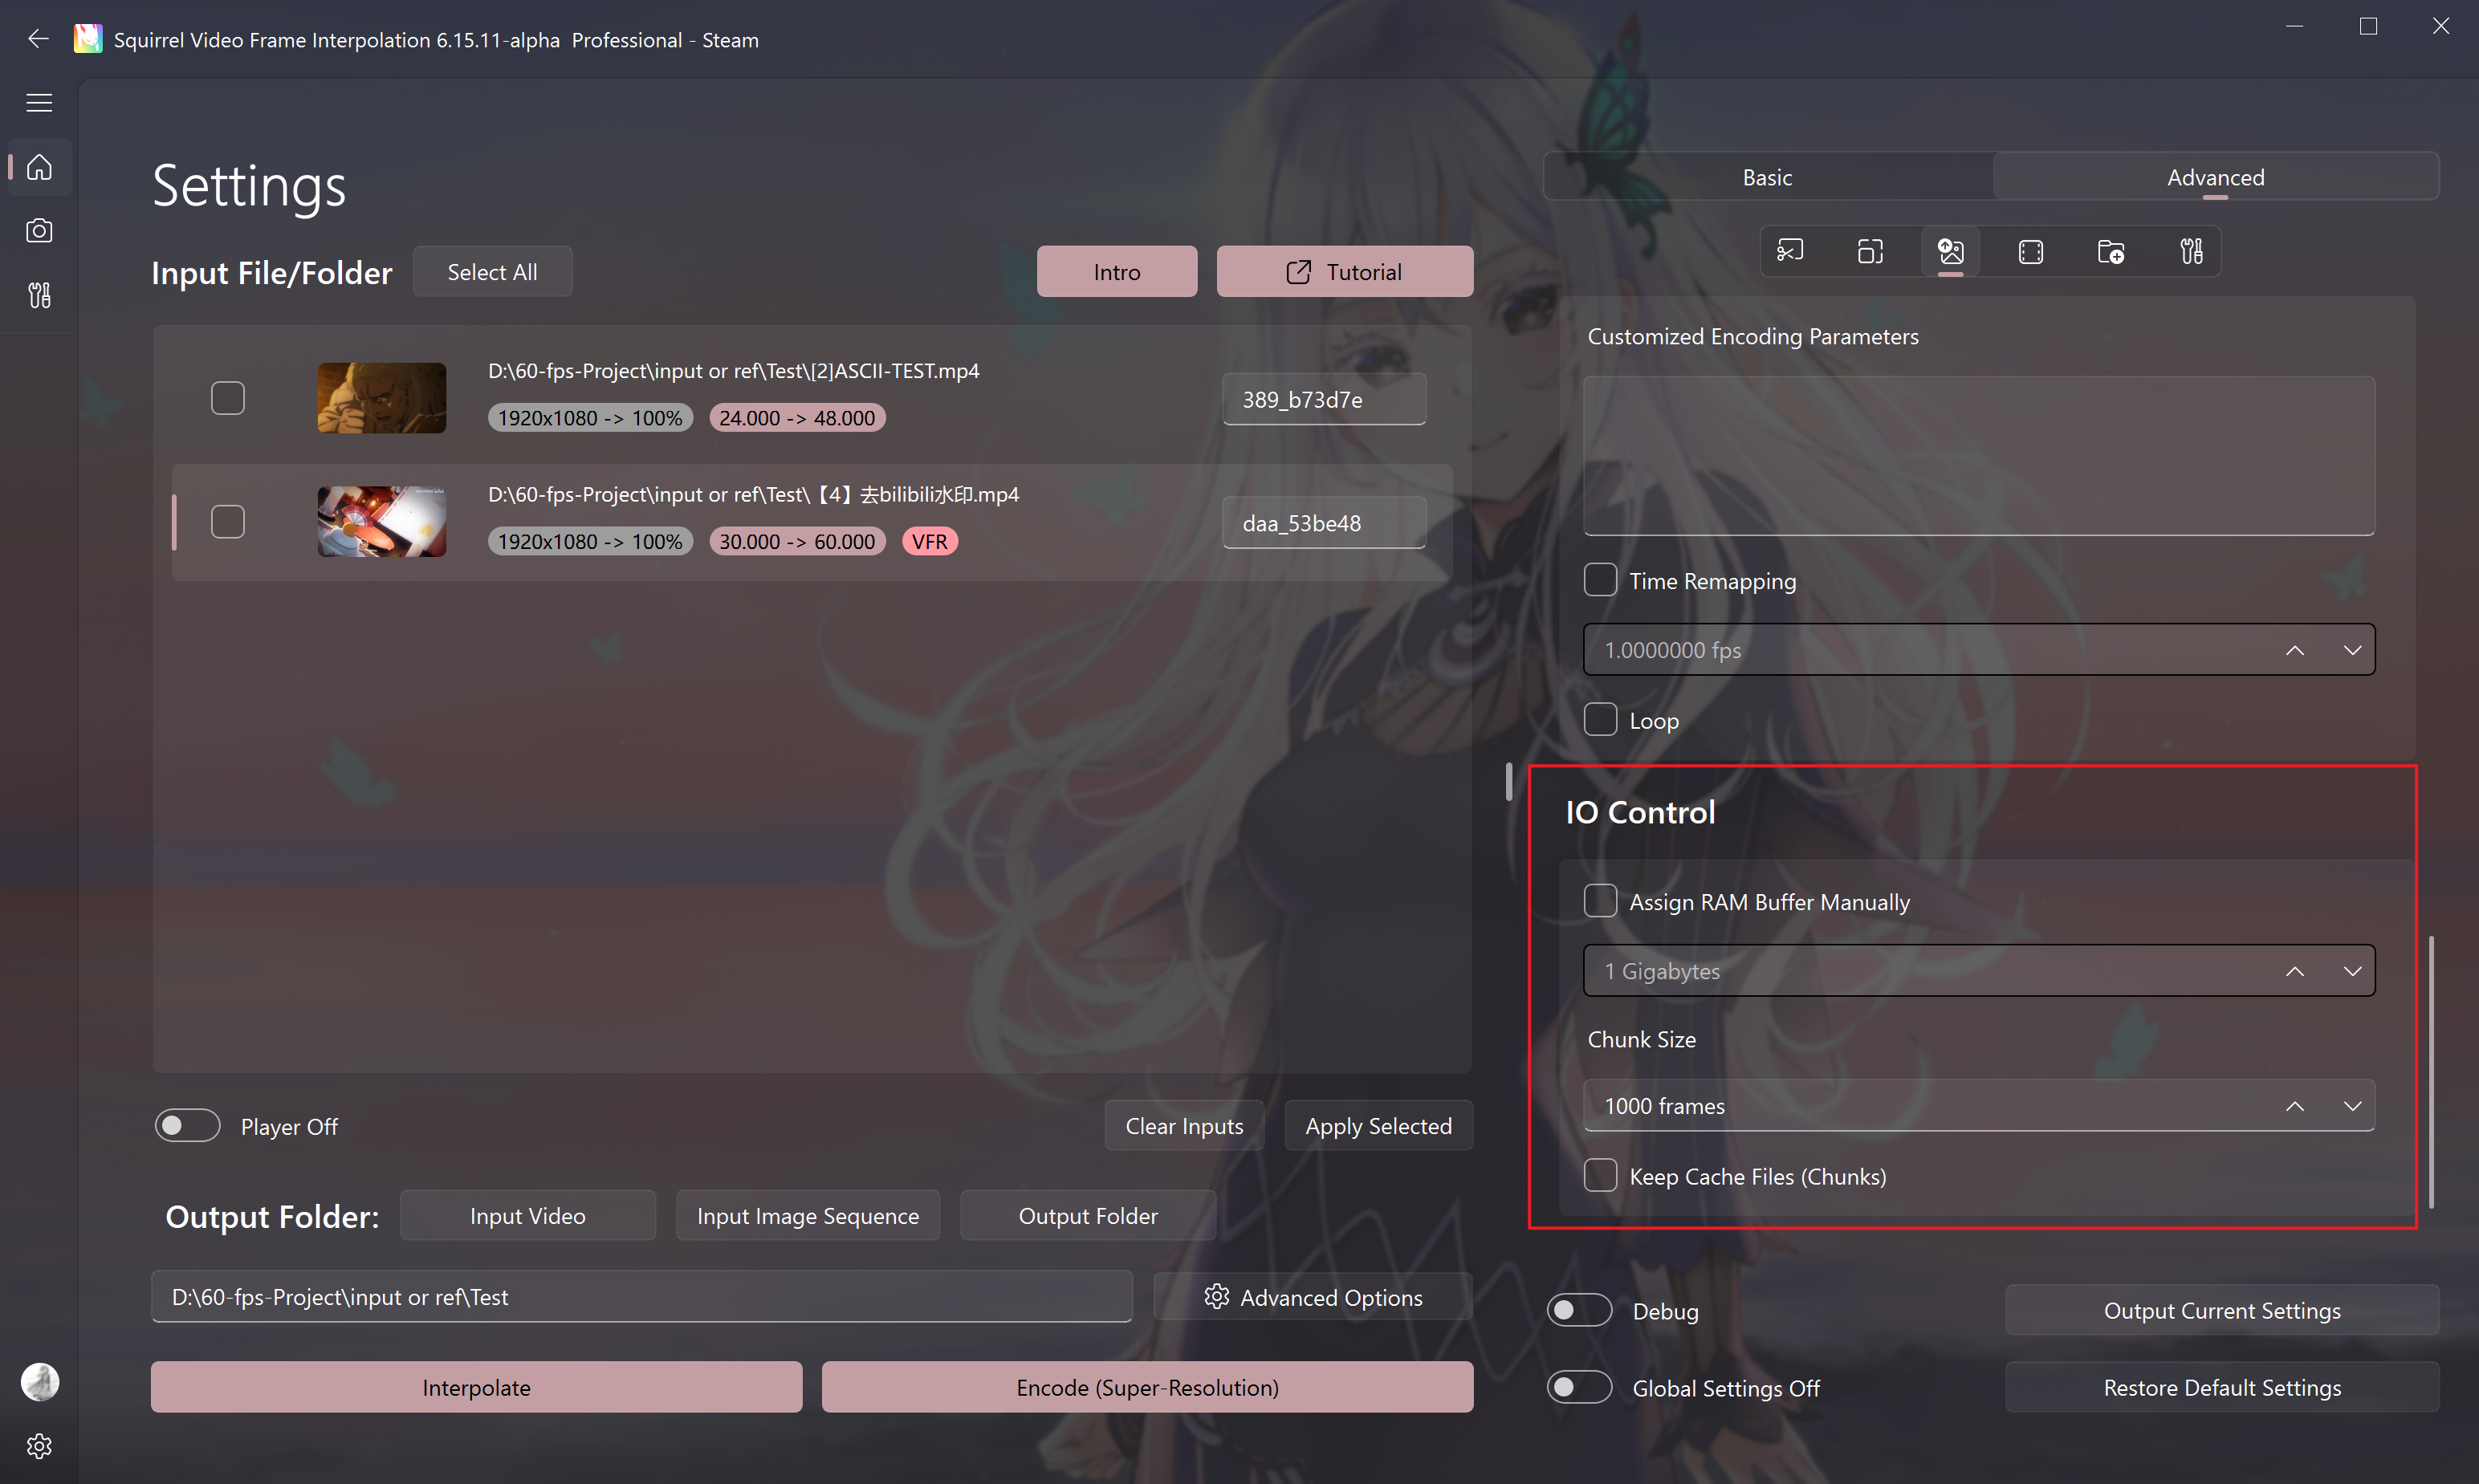
Assign RAM Buffer Manually
If the running memory is tight (below 16G), it is recommended to manually specify the size of the buffer memory to 2-3G to avoid out of memory errors.
Chunk Size
- For frame interpolation and encoding tasks, every frame rendered for this value will output a small clip without audio for you to preview the effect.
- The clips will be generated in the output folder you set, and merged into one file after the frame interpolation or encoding task is completed.
Keep Cache Files (Chunks)
Do not delete the project folder after the task is completed.
Frame Interpolation Settings
Safe FPS
If the video is to be uploaded to the corresponding media platform for online viewing, please enable this option.
This option will convert the output correctly to the corresponding NTSC format video (such as 60000/1001) when the input is an NTSC format video (such as a video with a frame rate of 24000/1001), to avoid audio-video asynchrony. If not enabled, audio-video asynchrony may occur (such as an output of 59994/1000).
It is recommended to keep this option enabled
Warning
If this option is not enabled, when the input is a non-standard frame rate (such as 119800/1000), the output mkv may become a variable frame rate video due to mkvmerge.
Try to use videos with standard input frame rates for processing to avoid audio-video asynchrony
Half-Precision Mode
It can reduce the video memory usage, and has acceleration effect for NVIDIA graphics cards of 20 series, 30 series, 40 series and above
Warning
May cause a decrease in picture quality.
For example, when using the gmfss model for frame interpolation, it may cause the output video to have a grainy feel
Reversed Optical Flow
This feature can make the picture smoother to a certain extent.
Tips
If the cudnn status error occurs when using the GMFSS pg 104 frame interpolation model, please turn off the reverse optical flow.
Enabling this feature may cause artifacts around moving objects in some models (such as Gmfss pg104). It needs to be selectively enabled or disabled after repeated experiments by yourself. The same applies to other similar functions.
Scale of Optical Flow
This is the optical flow resolution scaling factor used by SVFI when performing optical flow calculation using the frame interpolation algorithm. 0.5 means that the input picture is scaled by half and then the optical flow calculation is performed to improve the performance or effect of certain algorithms.
When using the RIFE algorithm, when the original video size is 1080P, the default is 1.0; 4K and above is 0.5; less than 1080P is 1.0
When using the GMFSS algorithm, when the original video size is 1080P, the default is 1.0; 4K and above is 0.5; less than 1080P is 1.0
Warning
When using the GMFSS algorithm, it is not recommended to fill in a value lower than 1.0 for the option when the original video size is less than or equal to 1080P
Interlace Interpolation
Equivalent to a special tiling, used to reduce video memory usage, there will be no screen tearing, but the picture will be blurred
Choosing this option appropriately can allow a small video memory graphics card to interpolate an ultra-high-resolution (such as 4G to 8K)
Smoothness Optimization
Warning
This series of options is only used for anime input or live-action materials with duplicate frames.
It is not recommended to enable this option for real-shot materials in general.
| Method | Application Scenarios | Speed | Smoothness | Number of Jellies |
|---|---|---|---|---|
| Spatio-Temporal Smoother (TruMotion) | Universal | ★★☆ | ★☆☆ | ☆☆☆ |
| Single Threshold | Universal | ★★★ | ★☆☆ | ☆☆☆ |
| Dedup shots on twos | Anime | ★★★ | ★★☆ | ★☆☆ |
| Dedup shots on twos/threes | Anime | ★★★ | ★★☆ | ☆☆☆ |
| Spatio-Temporal Resampling | Anime | ★★☆ | ★★★ | ★★★ |
| First-Order Dedup | Anime | ★★☆ | ★★☆ | ★★☆ |
| Dual Referenced Reconstruction | Anime | ★☆☆ | ★★★ | ☆☆☆ |
| Forward Dedup | Anime | ☆☆☆ | ★★★ | ☆☆☆ |
Note: The fewer the number of jellies, the better the video quality; the more stars, the more likely the algorithm will output jellies.
Explanation:
- Spatio-Temporal Smoother (TruMotion): Solves the jitter caused by the asymmetry problem during frame interpolation, and has a certain smooth and stable effect on any video (also known as TruMotion)
- Single Threshold: Used to alleviate the jitter feeling caused by duplicate frames, the general value is 0.2, 0.5, 1.0 or higher for anime
- Dedup shots on twos: Recognize and change one frame every two frames in the animation to one frame per one
- Dedup shots on twos/threes: Recognize and change one frame every three frames and two frames in the animation to one frame per one
- First-Order Dedup: Similar to removing one frame every two and one frame every three, but the dedup is more aggressive
- Spatio-Temporal Resampling: If the input video frame rate is around 24 and there is only one frame every three at most, and there is no higher frame rate picture, the jitter of the anime video material can be completely removed
- Dual Referenced Reconstruction: Similar to spatio-temporal resampling, the overall effect will be better. The input frame rate must be around 24, and the output frame rate can only be an integer multiple of the input frame rate, and is only used for specific models
- Forward Dedup: Completely remove the jitter of the anime video material. If the frame rate of your input video is around 24, the default is 2, which means it can solve the problem of jitter caused by one frame every three or less
Tips
Forward Dedup, Dual Referenced Reconstruction, Spatio-Temporal Resampling only support algorithms and models that can interpolate frames at arbitrary time step
If you are not sure whether your video is one frame per two or one frame per three, please check Anime Shots on Ns Introduction.
If the output video is still not smooth enough after using the dedup optimization, it may be due to the wrong scene detection, and the detection sensitivity threshold needs to be increased
Warning
Due to the limited ability of AI frame interpolation in anime frame interpolation at this stage, choosing dedup will increase the inter-frame motion range, resulting in picture distortion during frame interpolation. Please test and select the best dedup mode for each input video by controlling the variables multiple times.
It is recommended that you choose the dedup mode carefully. If you are frame interpolating long anime footage, it is recommended to use TruMotion.
Frame interpolation effect after enabling video smoothness optimization (forward dedup)


Process GPU
Specify which graphics card to use for frame interpolation
Introduction to Frame Interpolation Algorithms
Other Frame Interpolation Options Introduction
TTA Mode
Tips
This feature requires the purchase of the Professional DLC.
Enabling this feature can reduce picture jellies, reduce subtitle jitter, and weaken the problem of object disappearance. Making the picture more smooth and comfortable
It takes extra frame interpolation time, and some frame interpolation models do not support this feature.
The larger the number behind, the slower, the less jellies, usually just fill in 1 or 2
Medium to, suitable for RIFE 2.3
Forward Ensembled Optical Flow
The speed is reduced by about half, and the effect of the RIFE 2.x series frame interpolation model may be slightly improved
The gmfss/umss model enables bidirectional optical flow to accelerate by 5%, the effect will not change, but it will increase the video memory usage
Dynamic Scaled Optical Flow
Tips
This feature requires the purchase of the Professional DLC.
During frame interpolation, the optical flow scale is dynamically selected, which can reduce the problem of object disappearance and reduce jellies (only applicable to RIFE 2.3 and RIFE 4.6)
Custom Preset Bar
Tips
This feature requires the purchase of the Professional DLC.
New Preset
After naming the preset, click to create a new preset
Remove Preset
Delete the currently selected preset
Apply Preset
Load the previously saved preset and automatically load the parameters
Toolbox
Terminate Remaining Processes
Will end all tasks, including tasks that are opened by other SVFI instances.
Tips
If you need to avoid terminating tasks that are started by other SVFI instances, you need to manually end all SVFI CLI processes under the current SVFI process in the task manager. When enabling multi-threading, it is always recommended not to click the Terminate button manually.
Video to GIF
Generate high-quality GIF animations
Usage example:
Input video path:
E:\VIDEO\video.mp4Output animation (gif) path:
E:\GIF\video_gif_output.gifOutput frame rate: 30 fps
Tips
The output frame rate generally needs to be less than or equal to the frame rate of the original video, and it is not recommended to be higher than 30
Concatenate Chunks
Merge scattered chunk fragments.
Tips
If the task fails during the final merge, you can directly select the task item and click this button to complete the merge operation after adjusting the settings.
Audio Muxing
Fill in the complete path of the video (Example
D:\01\myvideo.mp4)Fill in the audio path of the video (Example
D:\01\myvideo.aac), or use a video to input audio (ExampleD:\01\otherVideo.mp4)Output video path (Example
D:\01\output.mp4)Secondary encoding audio: Compress the audio to aac format, 640kbps
Settings Under the Advanced Settings
Output Current Settings
Export the settings information as an .ini file, which can be shared with other users to contribute their settings. The usage method is to directly drag it into the software, and it will prompt that the preset has been successfully applied.
See Usage Tips for detailed usage.
Tips
If the video output of the software does not meet expectations, such as color shift, poor quality, etc., you can click this button and send the settings file to the developer to locate the problem.
Restore to Default
Restore Advanced Settings to Default. This will not affect the settings in the Preference settings panel.
Global Settings
Apply the same setting to all tasks in the list, with regard to the high-lighted current task before clicking start button.
Debug
Output debug information during the task.
Warning
In some cases, this mode will add debug content to the picture and slow down the task processing speed.
So please turn off this option when processing tasks formally.
Turbo mode
Accelerates the existing workflow, improving task processing speed.
Tips
This feature requires the purchase of the Professional DLC.
Tips
Available only for NVIDIA graphics cards, with some features and models having limitations
Bar Options on the left
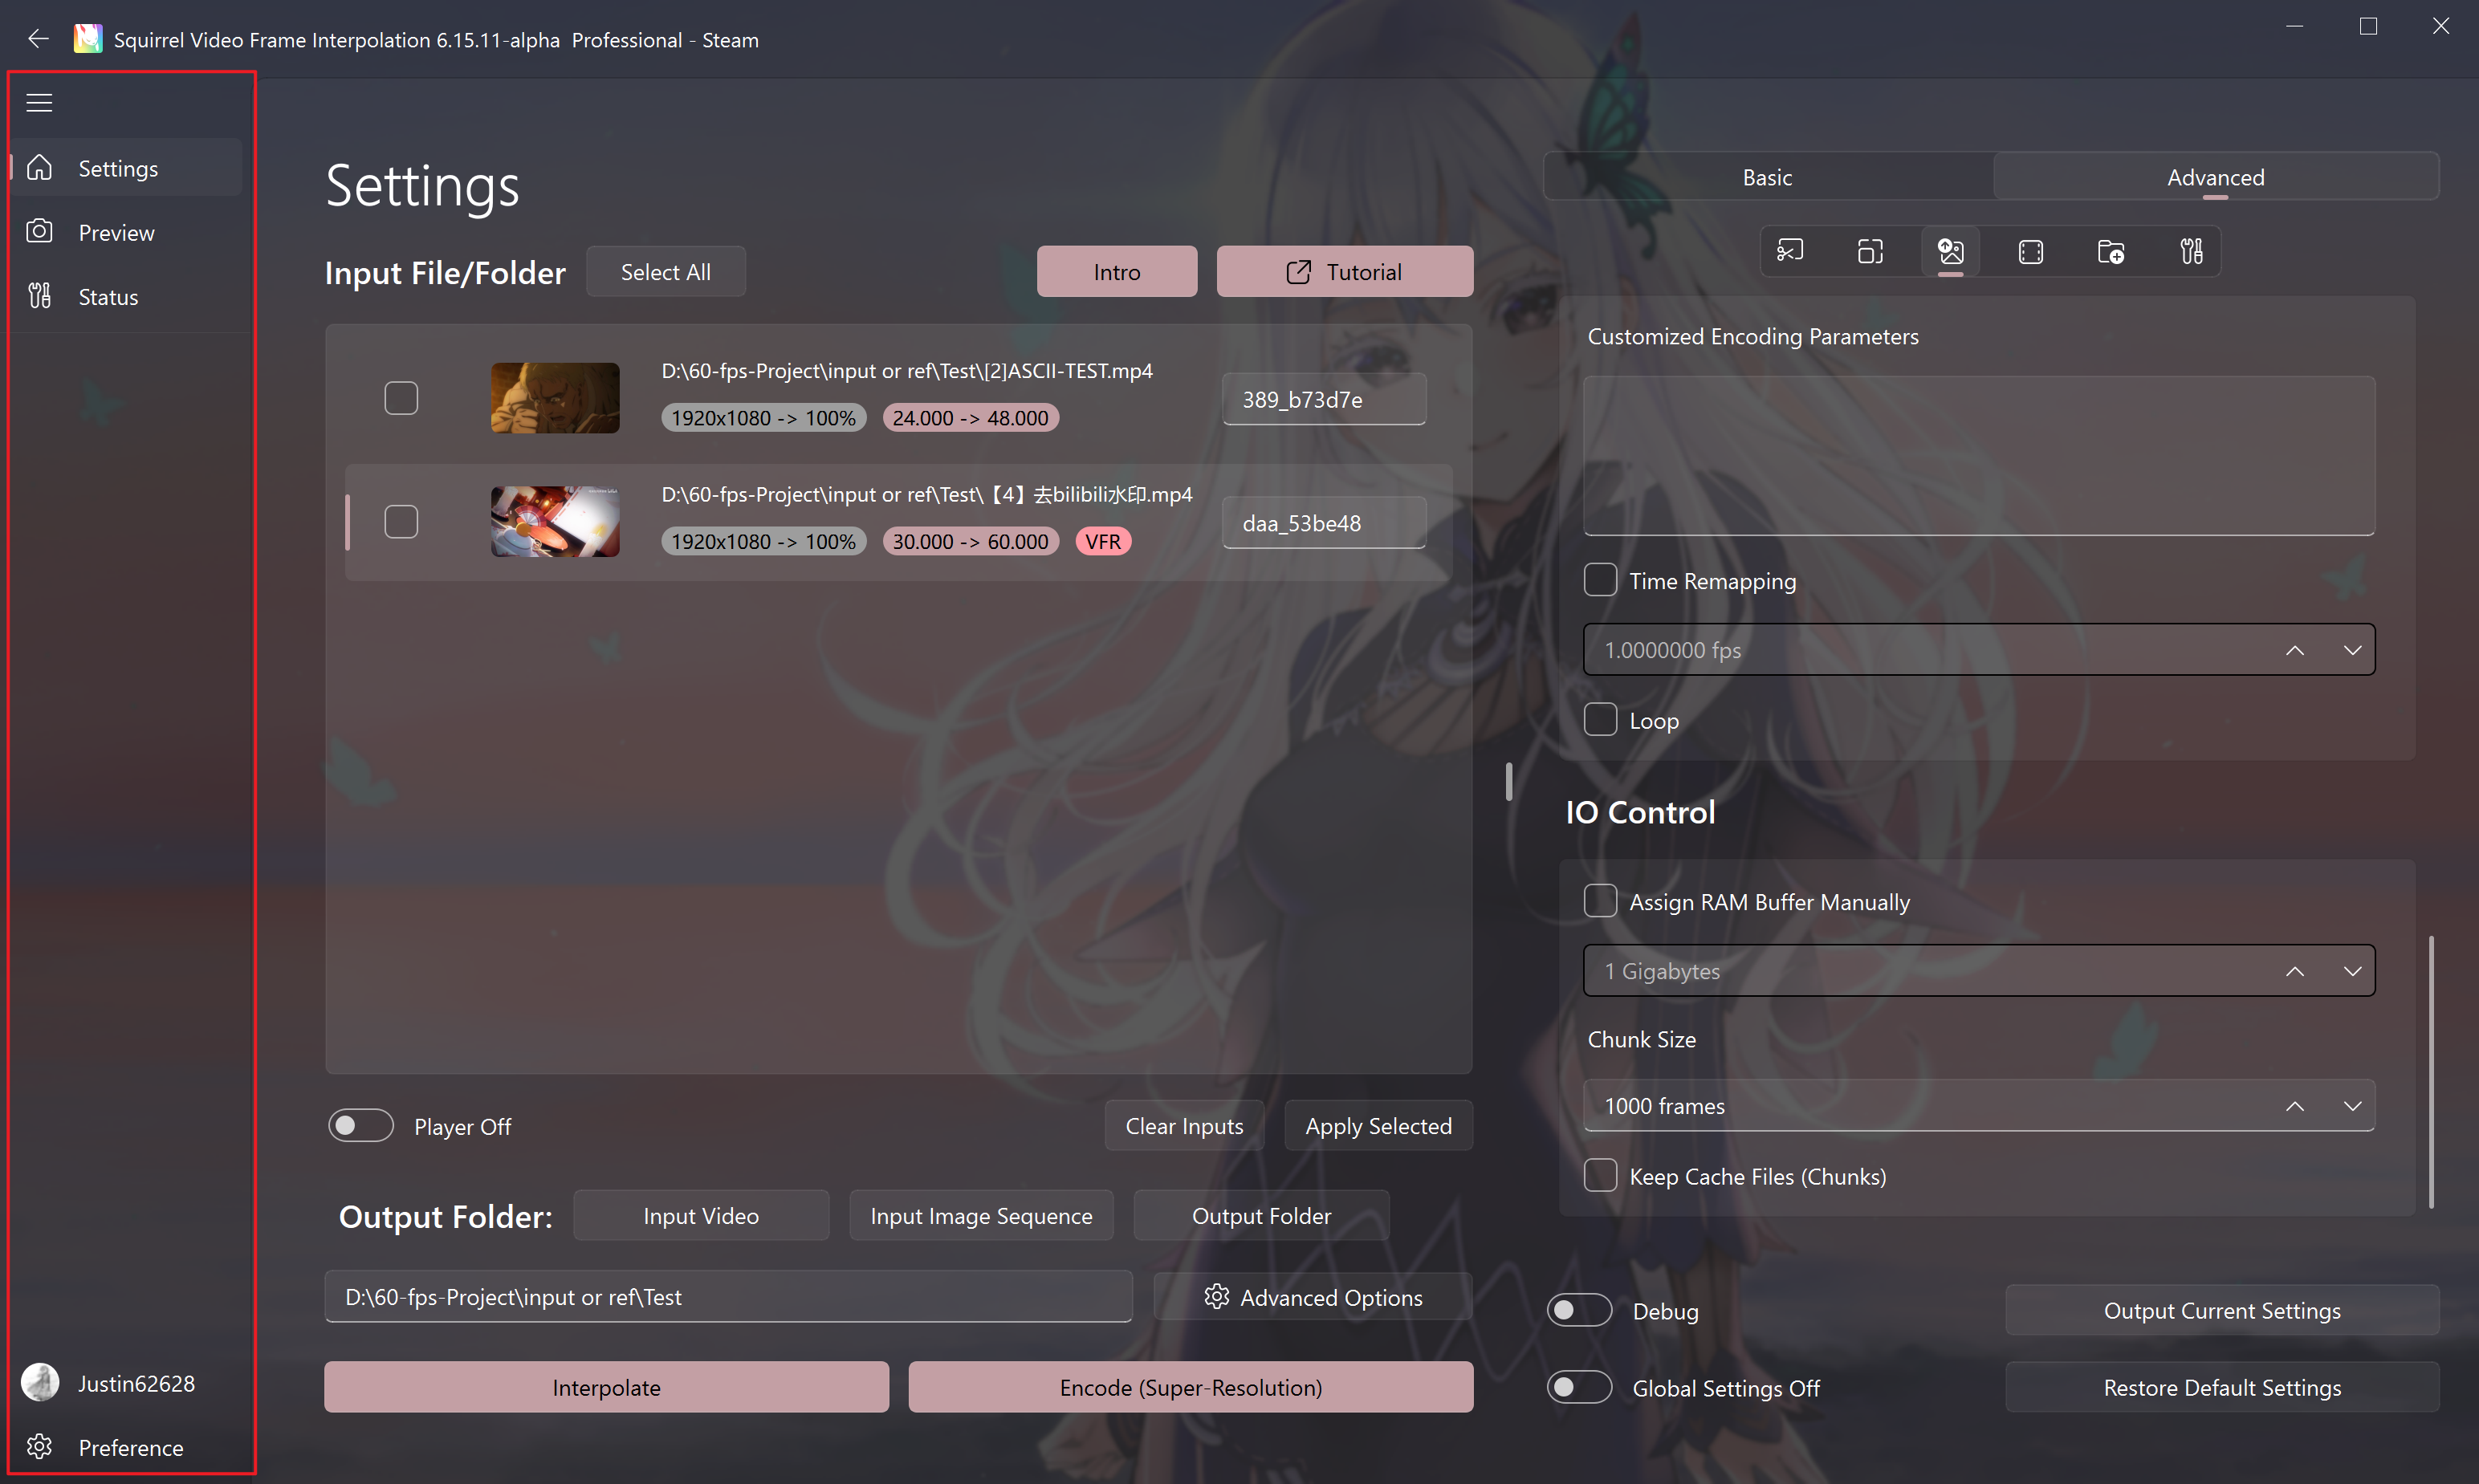
Settings
Main settings page
Preview
Output preview page
Tips
When previewing using the player interface, if the input is an HDR video, it is normal for the preview picture to be gray.
Status
View the program output information
User Page
View the software achievements and expandable or owned DLCs
Preference Settings
Rest Interval
Let the device rest for 15 minutes every X hours (temporarily pause the task)
Cache Folder
Specify the task folder to another location. The final output video will still be in the target folder
After task operation
You can choose some automatic operations after the frame interpolation is completed
Exit Recklessly
Default is enabled, the software forcibly ends the software process when an error occurs, avoiding residual processes
Tips
When you need to use the multi-instance or one_line_shot_args pipeline function of SVFI, it is recommended to turn off this option to avoid the instance being forcibly exited due to the forced exit of the software after it ends.
Enable Preview
Enable the preview window when frame interpolation
Auto Error Correction
Automatically modify settings to prevent task errors
Tips
Turning off automatic error correction can improve task initialization speed. It is recommended to turn off this option when processing queue tasks with stable settings.
In particular, if the encoding option or frame interpolation option setting value has an "AUTO" option, then even if this option is turned off, automatic error correction will be executed.
It is recommended to set all option values to non-AUTO values to completely turn off automatic error correction.
Custom Output Filename Abbreviation
You can customize the output file name. The default value is {INPUT}-{RENDER}.{16BIT}.{DI}.{DN}.{FG}.{DB}.{DP}.{OCHDR}.{FN}.{FPS}.{VFI}.{DEDUP}.{SR}.{FP16}.{DEBUG}_{TASKID}{EXT}. The meanings of each abbreviation are as follows:
| Abbreviation | Meaning |
|---|---|
| INPUT | Input file name |
| RENDER | Enable only encoding mode |
| 16BIT | Whether to enable high-precision mode |
| DI | Whether to enable de-interlacing |
| DN | Whether to enable noise reduction |
| FG | Whether to enable fast noise addition |
| DB | Whether to enable debanding |
| DP | Whether to enable lens stabilization |
| OCHDR | Whether to enable one-click HDR |
| FN | Whether to enable FMNet HDR |
| FPS | Output frame rate |
| VFI | VFI model used |
| DEDUP | Duplicate frame deduplication mode |
| SR | Super-resolution model used |
| FP16 | Whether to enable half precision |
| DEBUG | Debug mode |
| TASKID | Task ID |
| EXT | Output file extension |
Tips
At least one item in the abbreviation must be included, otherwise the output file name will be invalid.
Empty Task List After Interpolation
Clear the input queue after all tasks in the list are completed
Quiet Mode
Do not pop up windows and notifications
Windows on top
Keep the window on top to avoid possible Windows scheduling performance loss.
Background Image
You can select pictures to enable custom backgrounds
Background blur radius
The larger the value, the more blurred the background
Background opacity
The larger the value, the higher the background brightness
Classic Advanced Settings Layout
Use classic vertical advanced settings layout from SVFI 3.x
Application Theme
Change the theme of the application
Theme Color
Change the theme color of the application
Language
Set the preferred language for the user interface
Add White List
Click the button to add the installation folder to the Windows Defender whitelist. This operation is ineffective for other anti-virus software.
Check Installation Integrity
Click the button to check the file integrity through Steam at the next startup. It may be possible to fix some problems where the software cannot run normally due to software updates or incorrect settings.
Use CPU Only
Perform AI tasks only using the CPU. Only applicable to devices without graphics cards.
Use All GPUs
Use all available GPUs for AI reasoning acceleration.
Warning
If the device has only one graphics card, please be sure to turn off this option.
TensorRT INT8 Quantization Function
Accelerate the running speed of TensorRT models, but it will take more time to compile TensorRT, and may cause the model effect to decline, please use this feature with caution.
The software will default to quantize the model for 750 rounds, and the number of quantizations can be adjusted in Advanced Related Settings. The processing time is long, and the acceleration may not be obvious on some devices.
Help
Learn about new features and useful tips of SVFI (shortcut operations, shortcut keys, etc.)
Provide Feedback
Provide feedback to help us improve SVFI
Privacy Agreement
Click the button to determine whether to send non-private diagnostic data to help us improve the software.
About
Software copyright and logs