
Encode and decode settings
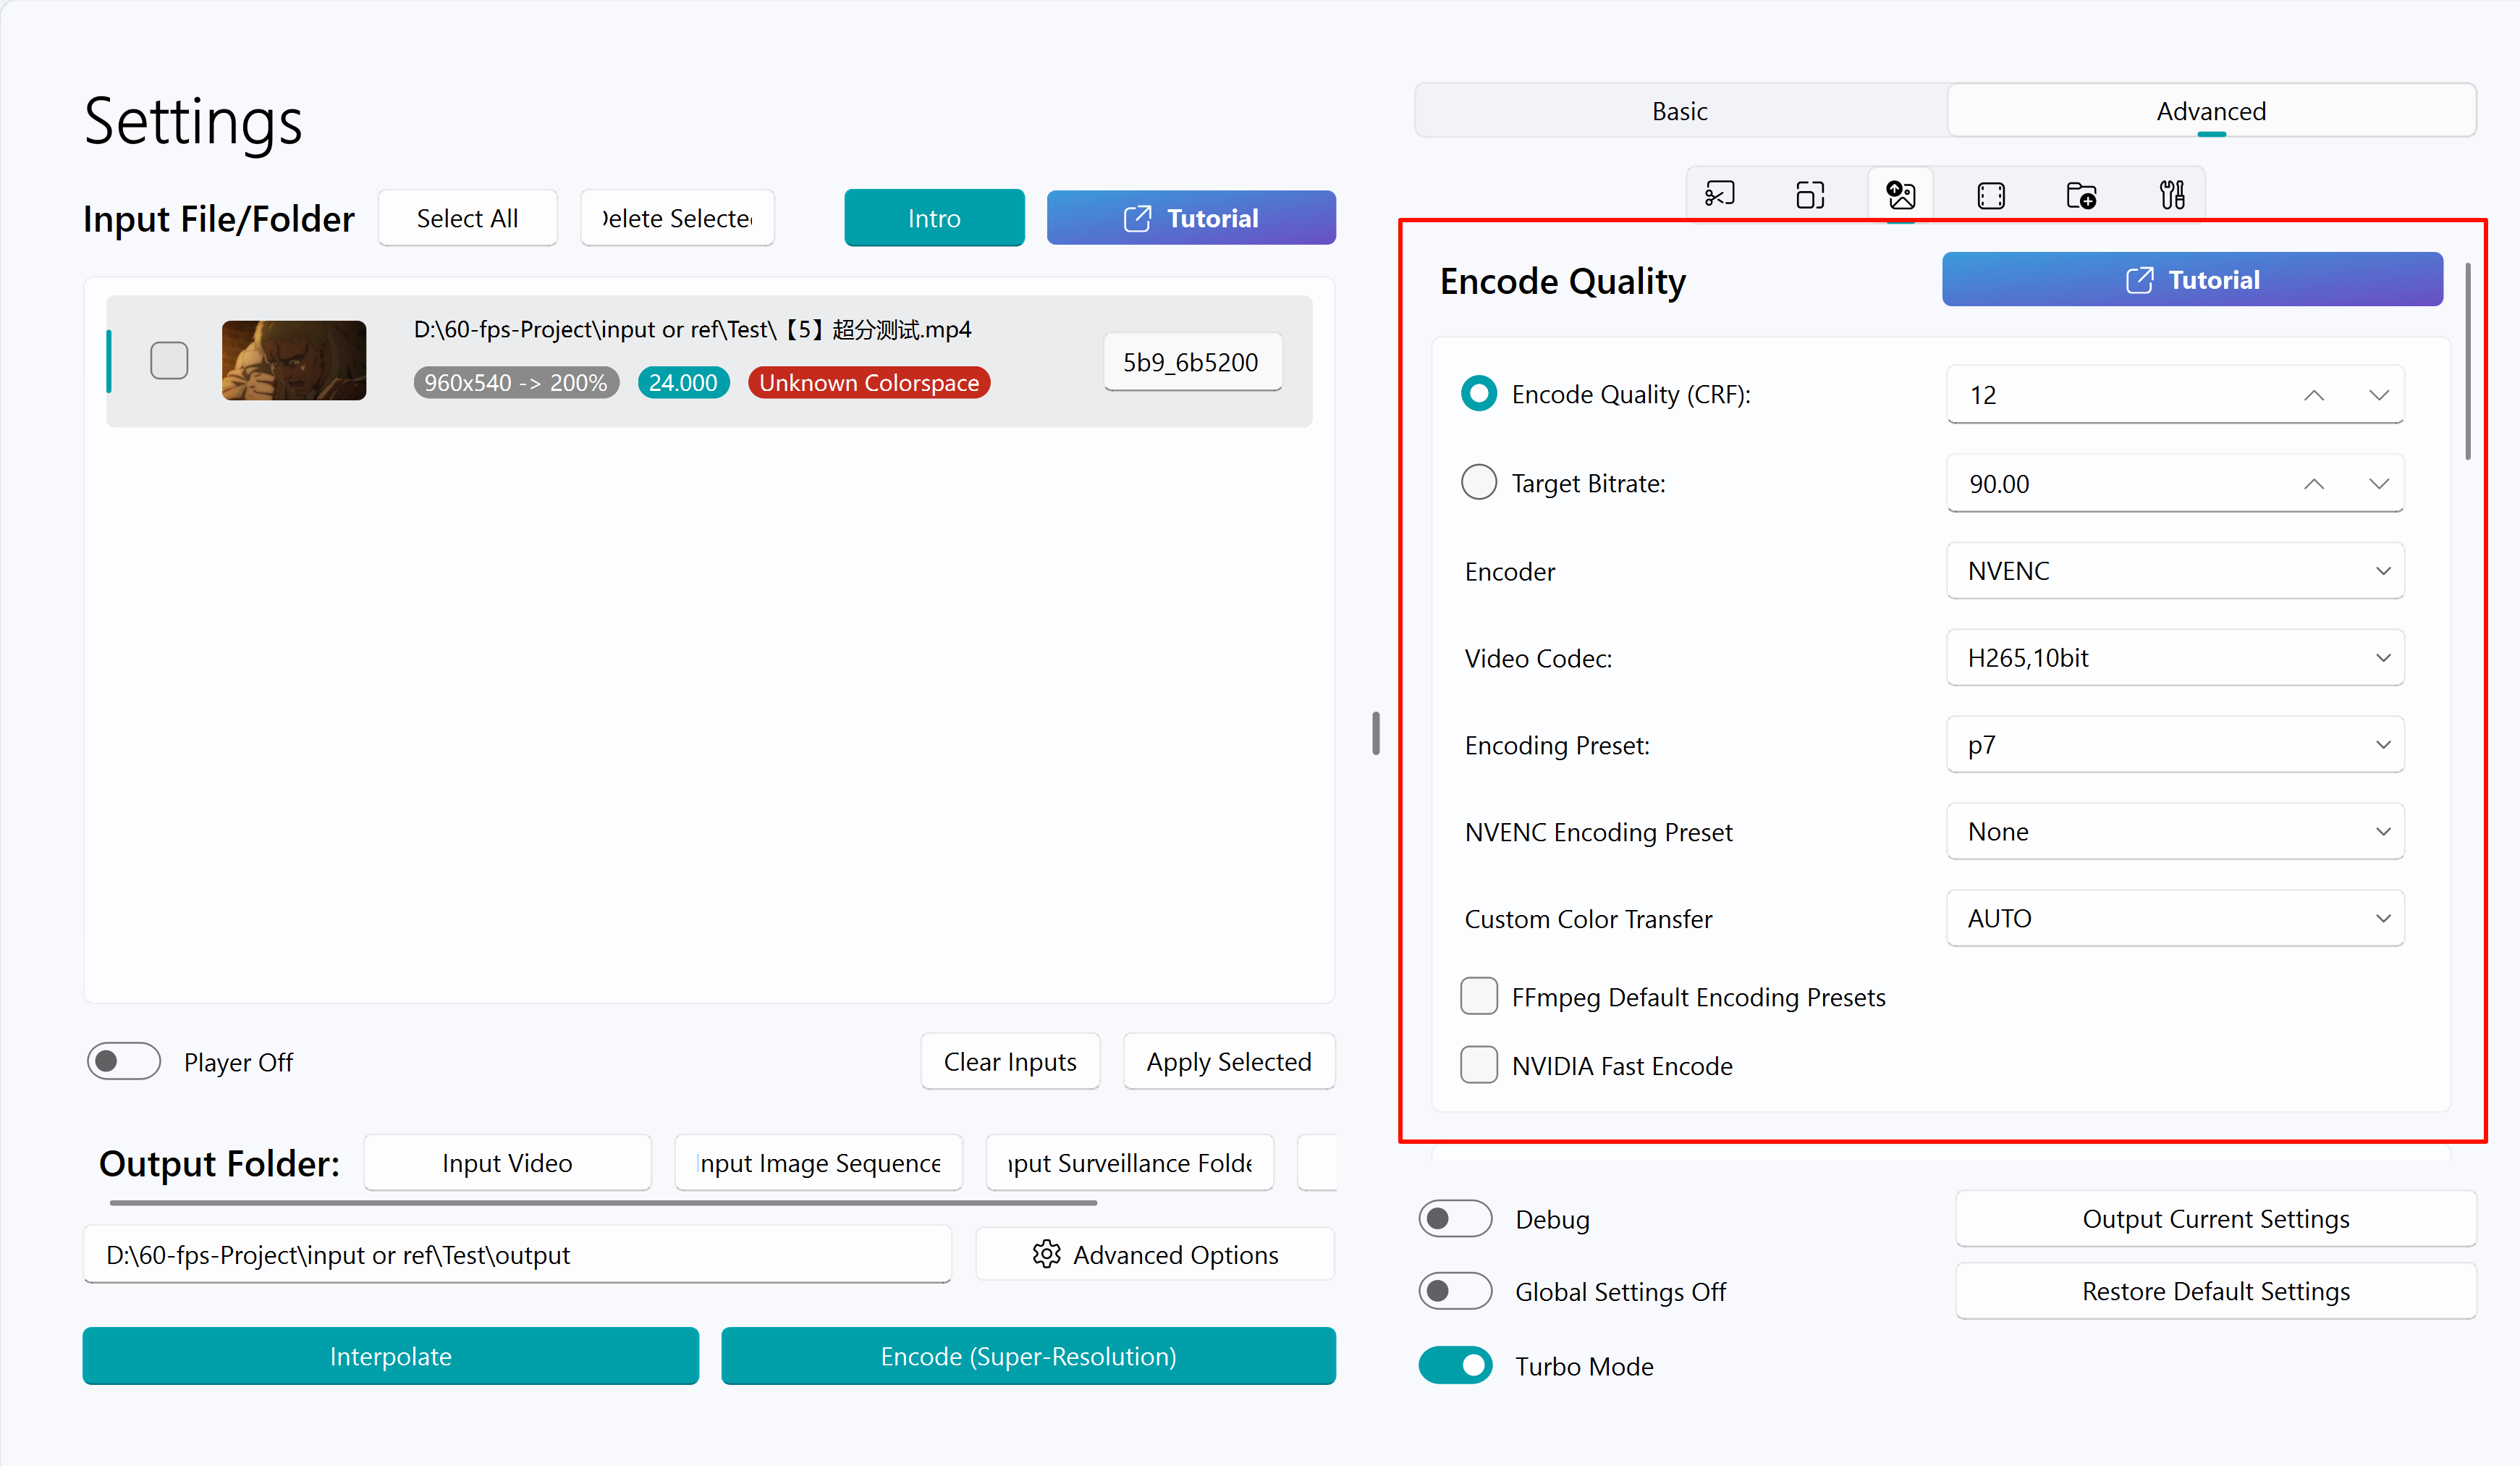
Used to tune encoding (compression) and decoding quality.
Encoding parameter area
Encode quality (CRF)
Used to adjust the quality loss when the video is exported, which is positively correlated with the output bitrate.
Using different encoding codecs and encoding presets will have an impact on CRF.
The CRF numerical parameter is generally 16, which is lossless to the naked eye;
For H.265 encoding, the bitrate will be significantly reduced. Please use the visual quality of the picture to determine whether the CRF numerical value is reasonable.
If it is used for archival-grade output, the CRF numerical parameter can be set to 12.
The smaller the CRF value, the less the loss of the picture after the operation, and the larger the volume (bitrate) of the exported finished video.
Warning
Different encoders can produce different visual quality at the same numeric setting.
For some encoders (such as NVENC), the value here behaves like a CQ control rather than classic CRF.
Tips
When adjusting the output video bitrate, if you are not familiar with CRF, please use the default value 16.
Target bitrate
As an alternative to CRF-based quality, it is basically the same as the setting style of Adobe Premiere Pro, After Effects, and DaVinci Resolve.
Encoder
- AUTO
Automatically determine the encoder option based on the slider below the software - CPU
Select this option for encoding, the quality is the highest, but the CPU usage rate is also the highest. The performance of the CPU determines whether the frame interpolation or super-resolution process will be blocked (resulting in a decrease in the graphics card usage) and the length of time it takes to complete the final operation. - NVENC
This option is only for NVIDIA graphics cards that support the NVENC function. If your graphics card does not support the NVENC function, please do not select this option.
Please refer to the NVIDIA NVENC Gen.pdf in the installation directory to check whether your graphics card supports NVENC - VCE
This option is only for AMD graphics cards that support the VCE function. If your graphics card does not support the VCE function, please do not select this option. - QSV
This option is only for users with Intel integrated graphics (such as Intel UHD 630, IrisPro 580). Non-such users should not select this option.
Tips
The following codecs need to purchase the Professional DLC
- NVENCC is an optimized version of NVENC, with faster processing speed and better work quality.
- QSVENCC is an optimized version of QSV, with higher efficiency in completing tasks.
- VCENCC is an optimized version of VCE, with higher efficiency in completing tasks.
Manually specify the GPU used by the hardware encoder
In Custom encode command line under Advanced Settings,
- When using the encc encoder, fill in
-d||<gpu>to control the used encoding GPU, such as-d||0 - When using the ffmpeg nvenc encoder, fill in
-gpu||<gpu>to control the used encoding GPU - When using the ffmpeg vce, qsv encoder, fill in
-init_hw_device||qsv=intel,child_device=<gpu>to control the used encoding GPU
Sensible comparison:
| Encoder | Use Hardware | Speed | Quality | File Size | Selection Suggestions |
|---|---|---|---|---|---|
| CPU | CPU | Medium | High | Medium | Users who prioritize image quality and encoding stability, including AMD GPU users |
| NVENC | NVIDIA GPU | Fast | Medium | Large | Users who want both speed and quality; best for NVIDIA GPUs |
| QSV | Intel graphics | Fast | Medium | Large | Users who want both speed and quality; systems with Intel iGPU or Intel discrete graphics |
| VCE | AMD graphics | Fast | Medium | Large | Users who want both speed and quality; systems with AMD iGPU or AMD discrete graphics |
Select the encoding codec
If you are not familiar with encoding, please keep the following rules in mind:
- For HDR video, always choose H.265 10-bit to retain HDR metadata. Do not choose H.264 for HDR delivery.
- For resolutions above 2K, choose H.265.
- If H.264/H.265 playback shows corruption, try an mpv-based decoder path; for editing workflows with enough storage, ProRes is a good mezzanine codec (visually near-lossless, very large files).
- In most cases, H.265 fast or ProRes is a practical default.
- When a
Broken Pipeerror occurs, switch directly to H.265. Note that codecs have maximum resolution and frame rate limits. - Do not chase extreme resolution and frame rate at the same time (for example, 8K 120 fps).
Tips
- CPU encoding is software encoding: generally slower, smaller files, higher quality.
- NVENC, QSV, and VCE are hardware encoders: faster, larger files; at low bitrates / small files, quality can be worse than CPU encoding.
- Prefer NVENC when available. In the NVIDIA hardware preset list, check your GPU generation on the NVIDIA encode/decode matrix. RTX 20/30 series and newer can usually use 7th+ class presets.
- Hardware encoding loads the GPU. If Broken Pipe appears with NVENC, lower the NVIDIA preset or switch to QSV on Intel graphics.
- If errors persist, use CPU encoding.
Other general suggestions
- If the output is only for personal viewing and encoding quality requirements are low, prefer hardware encoding (NVENC, VCE, QSV, etc.) to avoid a CPU encode bottleneck. A CPU bottleneck lowers GPU utilization and slows the whole job.
Select the encoding preset
CPU: the faster the preset, the lower the quality, and vice versa.
NVENC (NVIDIA): It is fine to pick p7 directly.
QSV (Intel graphics): Pick slow directly.
VCE (AMD GPU): Pick quality directly.
NVENCC (NVIDIA): Pick quality directly.
QSVENCC (Intel graphics): Pick best directly.
VCENCC (AMD GPU): Pick slow directly.
Enable zero-latency decode/encode
It is only valid when the selected output codec is H.264 or H.265.
Using this feature can reduce the video decoding pressure, and is suitable for scenarios that require fast decoding and low latency, such as:
- When uploading video works to platforms such as BiliBili and Youtube, to avoid jitter transcoding
- When playing ultra-high-definition and ultra-high-frame-rate content on VR headsets
- When the player decodes the screen is distorted
Warning
This feature does not work when the input is HDR
NVENC encoding preset
When choosing the NVENC encoder, the preset can reduce the export video size without changing the picture quality. You need to query which generation of NVENC encoding chip your NVIDIA GPU is. If it exceeds 7th, directly select 7th+.
Default encoding scheme
Uses ffmpeg's traditional encoding path; exported files may be larger.
Tips
Enabling this feature can solve most Broken Pipe problems.
Re-encode audio
- Re-encode the audio; commonly used when uploading to UGC platforms.
- Compress all audio tracks in the video to 640 kbps AAC.
HDR strict mode
Uses CPU H.265 processing for HDR to maximize compatibility. Leave enabled unless you know you need otherwise.
Dolby Vision / HDR10 compatibility
When outputting Dolby Vision, keep HDR10 compatibility enabled unless you have a specific reason to disable it.
One-click HDR
Contains four one-click HDR modes for different scenarios; try them and pick what looks best on your content.
Decoding quality control
Hardware decoding
It can reduce the decoding pressure of large-resolution videos, but may reduce the picture quality to a certain extent, and cause the frame interpolation module to run out of video memory when the video memory is tight.
Fast frame extraction
Fast frame extraction can reduce decoding pressure, but may cause color shifts.
High-precision optimization workflow
Tips
This feature requires the purchase of the Professional DLC.
- If the CPU performance is excessive, it is recommended to enable this feature, which can solve most color deviation problems and can solve the color cast problem caused by HDR video encoding to the greatest extent. This feature will increase the CPU burden and even affect the frame interpolation speed.
- Enabling this feature for super-resolution work will disable half-precision (requires more video memory). Please choose according to your needs.
Tips
It is recommended to enable this option when inputting HDR videos.
Use VSPipe
Tips
This feature requires the purchase of the Professional DLC.
Decode through VSPipe. This is a prerequisite for many specific features (such as deblocking, fast grain, QTGMC deinterlacing).
If VSPipe cannot decode your input or the task errors, turn this option off.
Tips
You can edit the vspipe.py template in the installation folder to add custom filters such as dpir. You can also change the default super-resolution before VFI order based on it.
Full VSPipe workflow
Tips
This feature requires the purchase of the Professional DLC.
Processes the whole pipeline with VSPipe to reduce redundant work.
Only TensorRT-accelerated super-resolution and some frame interpolation models are supported.
Enable deinterlacing
Tips
This feature requires the purchase of the Professional DLC.
Use ffmpeg to deinterlace interlaced inputs.
When VSPipe pre-decoding is enabled, QTGMC is used for deinterlacing.
Denoise
Tips
This feature requires the purchase of the Professional DLC.
Unless you have a specific need, keep this closed; otherwise it will slow down task processing.
Tips
It is recommended to test this option by controlling the variables yourself to see if it is helpful for improving the picture quality.
Not compatible with the high-precision optimization workflow.
Fast grain
Add noise to the video, often used together with super-resolution.
Custom decode parameters
Used to replace ffmpeg or VSPipe decode parameters; separate custom tokens with ||.
Custom encoding settings
Specify the number of encoding threads
When the encoder is CPU, there is a chance to control the CPU usage rate to control the rendering speed.
Customized encoding parameters
This feature is a professional option (note that the number of input items must be even),
The key values are separated by ||
Example Custom encoding parameters for CPU h265 encoding:
-x265-params||ref=4:me=3:subme=4:rd=4:merange=38:rdoq-level=2:rc-lookahead=40:scenecut=40:strong-intra-smoothing=0
You can also addpools="8,8,8,8"to assign core specific encoding threads
Time remapping: change the speed of the video
Tips
This feature requires the purchase of the Professional DLC.
This feature is used to create "slow motion" materials.
For example, if the output frame rate is set to 120 frames and the time remapping is set to 60 frames, the output effect is equivalent to 50% slow playback of the playback speed.
Similar to other situations, you can set the output frame rate by yourself, support decimals.
Warning
For anime materials, please try to enable Forward Dedup in the Smoothness Optimization of the VFI Settings as much as possible.
Or use software such as Premiere to reduce the frame rate of the original video to remove the repeated frames to avoid jitter after remapping.
The frame rate of the original video is generally reduced to 8 or 12 fps
Loop
Put the last frame in the first frame to adapt to some looping videos that are connected end to end.
Tips
Under normal circumstances, the end will miss (output frame rate / input frame rate) frames because there are no new frames that can be interpolated, which is normal. But it is not affected in the loop mode, because there are always frames that can be used as pairs for interpolation.
IO control
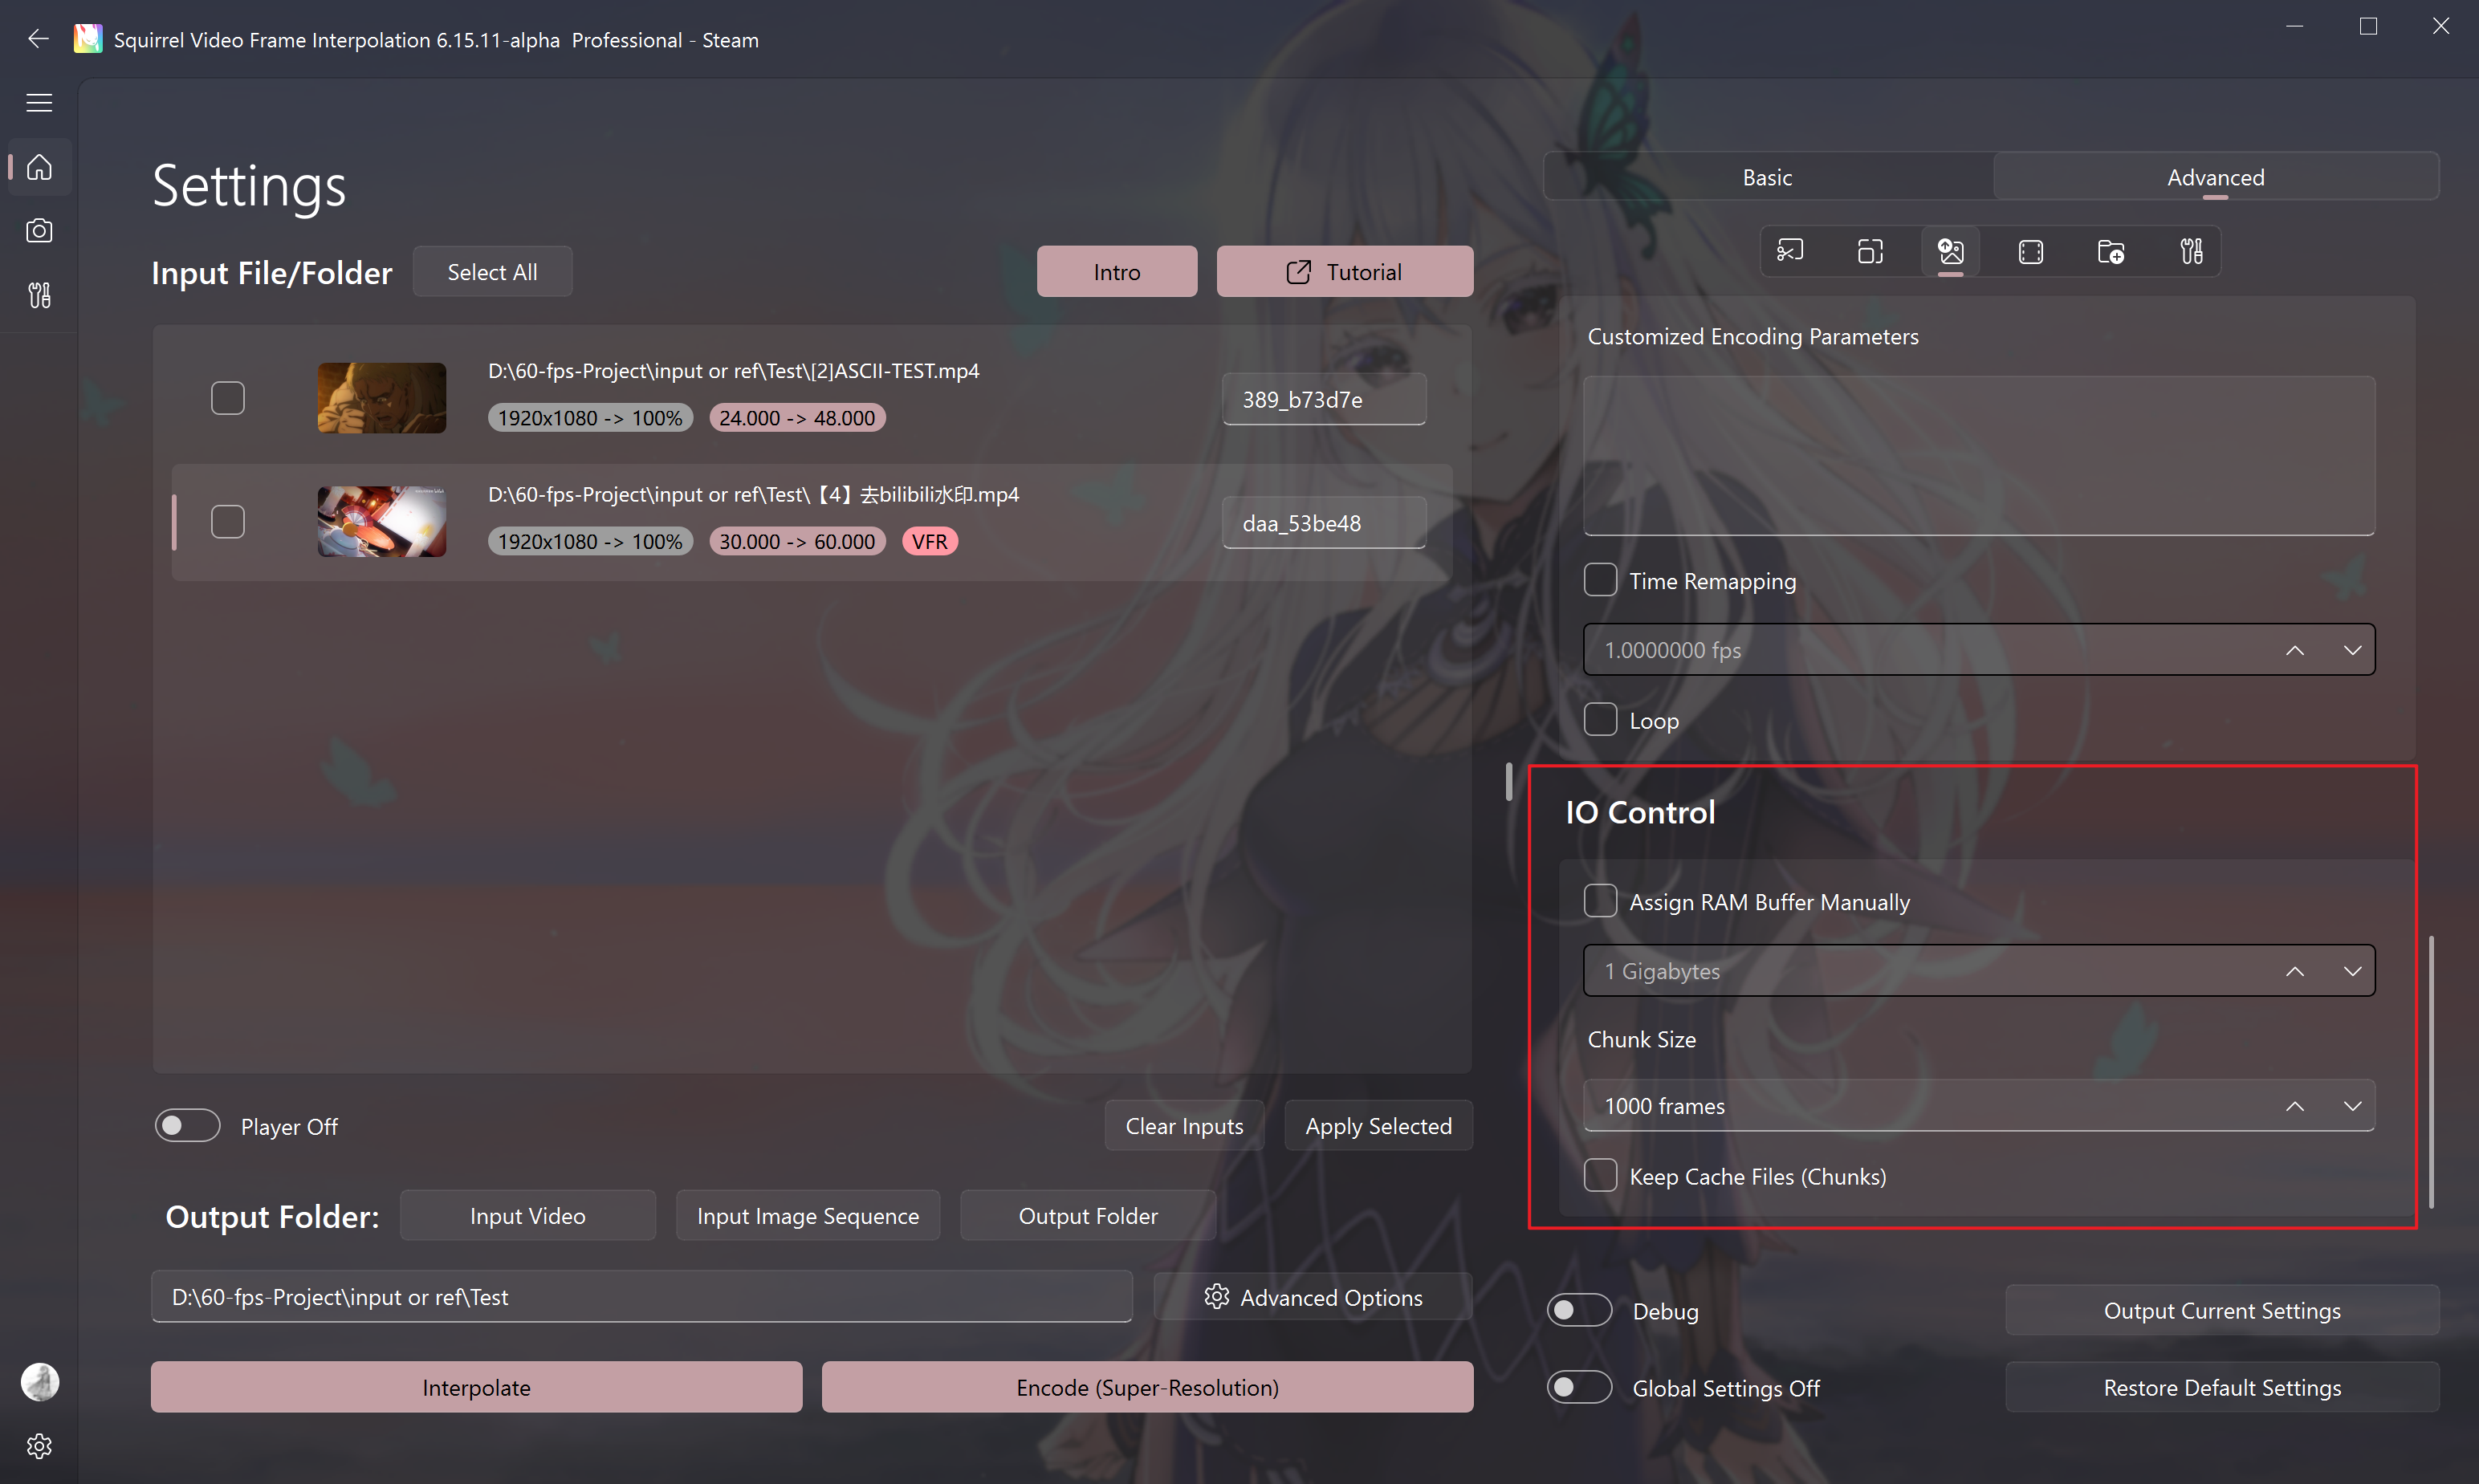
Assign RAM buffer manually
If the running memory is tight (below 16G), it is recommended to manually specify the size of the buffer memory to 2-3G to avoid out of memory errors.
Chunk size
- For frame interpolation and encoding tasks, every frame rendered for this value will output a small clip without audio for you to preview the effect.
- The clips will be generated in the output folder you set, and merged into one file after the frame interpolation or encoding task is completed.
Keep cache files (chunks)
Do not delete the project folder after the task is completed.